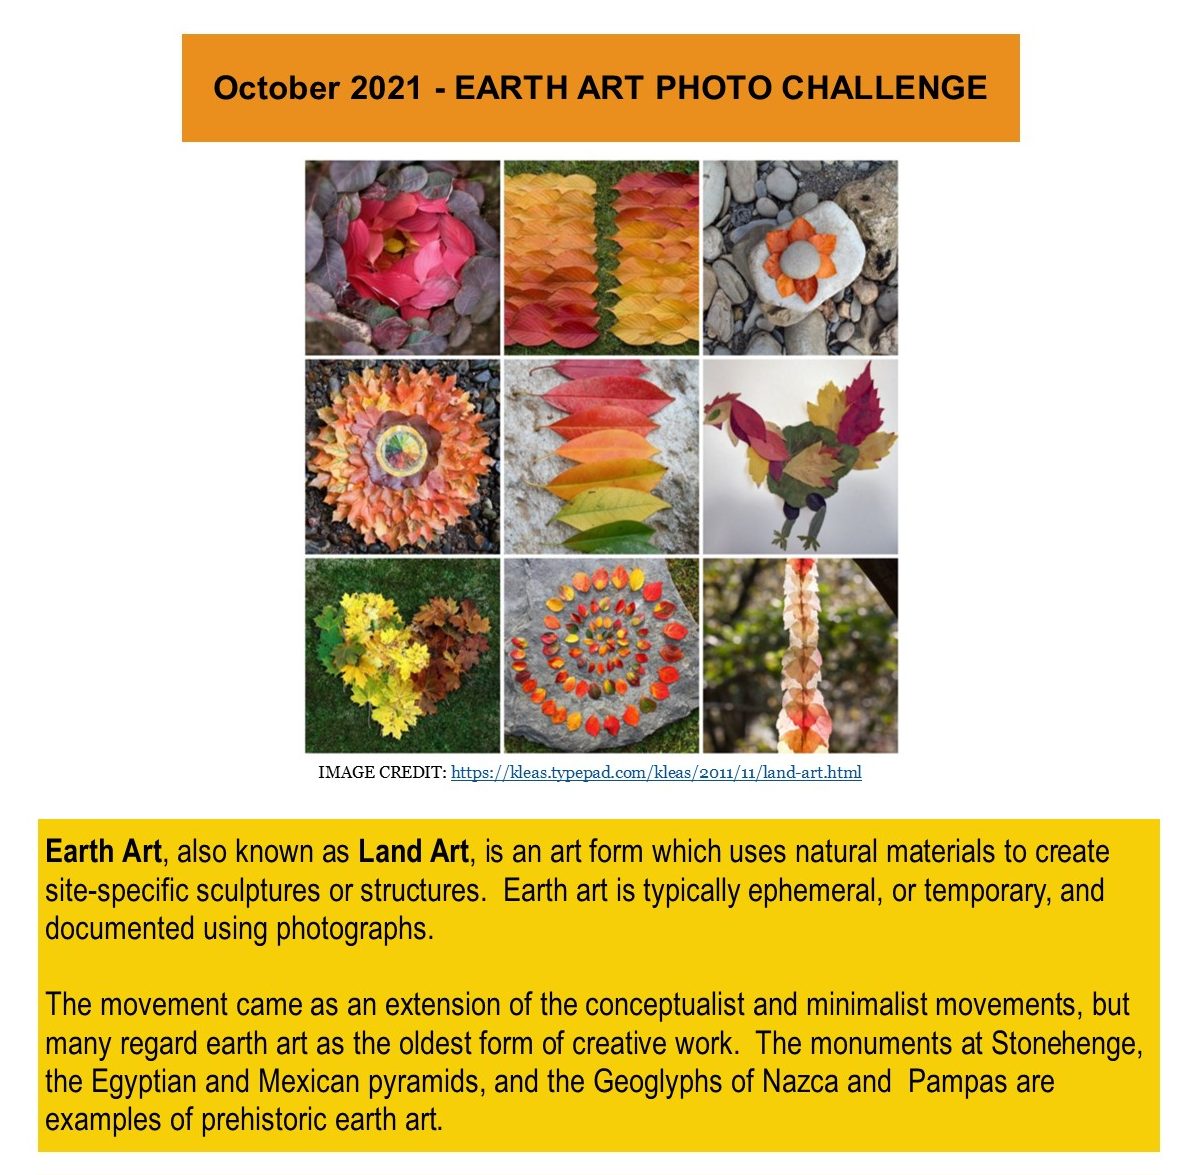
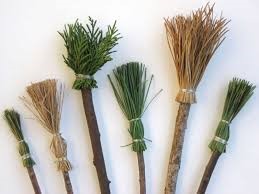
BBAC’s Art Challenge
The BBAC wants to challenge all ages to make art within your surroundings & with everyday things that you have at home. (For the previous Art Challenges, scroll down.)
To see some of the Art Challenge creations, click here. Take a photo of your art & email it to the BBAC. Send to Info@BBArtCenter.org & put Art Challenge in the subject line. We are posting some of these photos on our website & social media platforms, Facebook & Instagram.
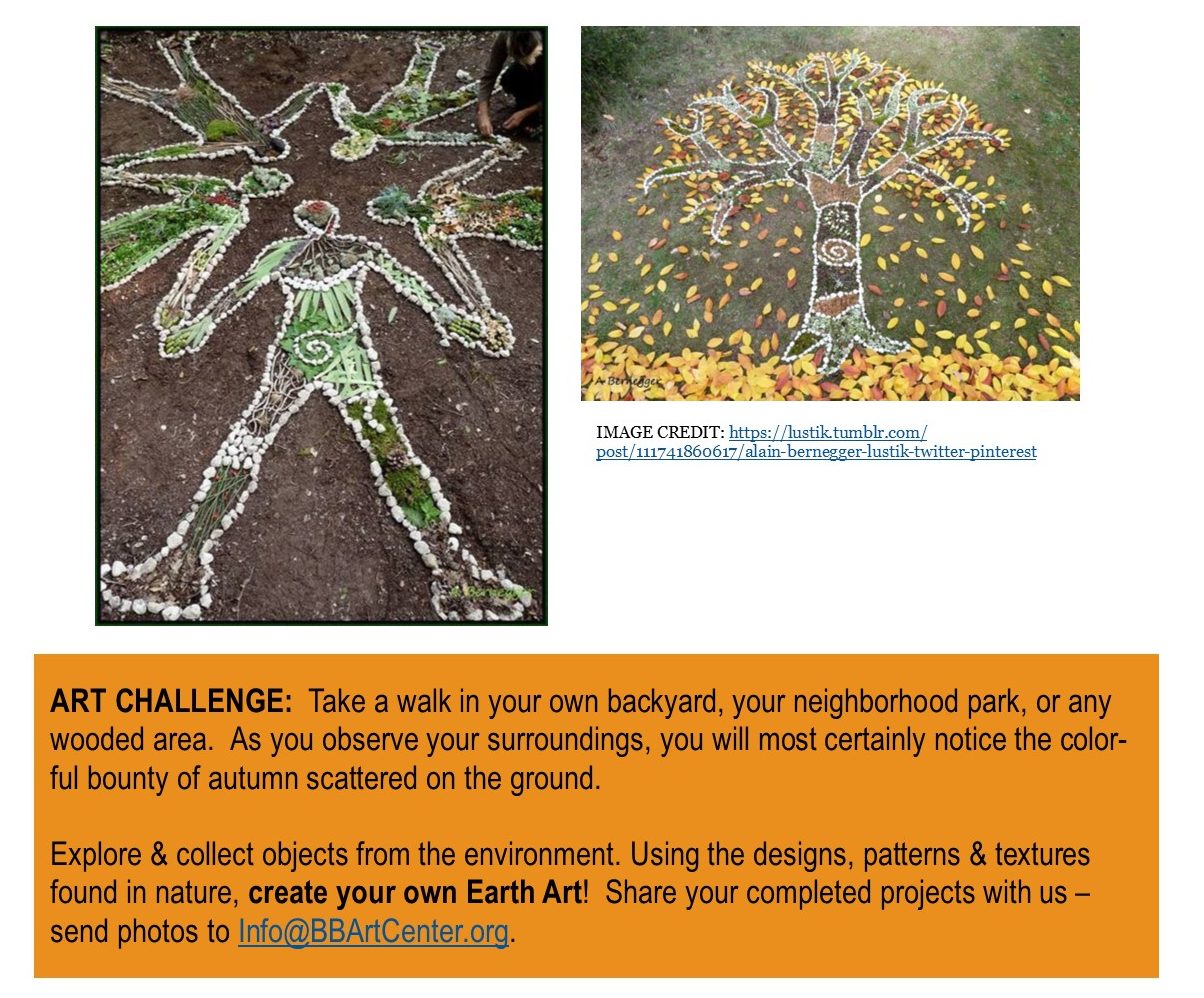
Learn more about Land Art HERE.
Explore the work of Bavarian earth artist Nils-Udo HERE.
Get inspired by reading this INTERVIEW with British land artist Richard Shilling.
Watch this VIDEO to learn more about Robert Smithson’s 1970 earth art sculpture, Spiral Jetty.
For more Earth Art / Land Art inspiration, check out the Natural Art Group on Flickr.
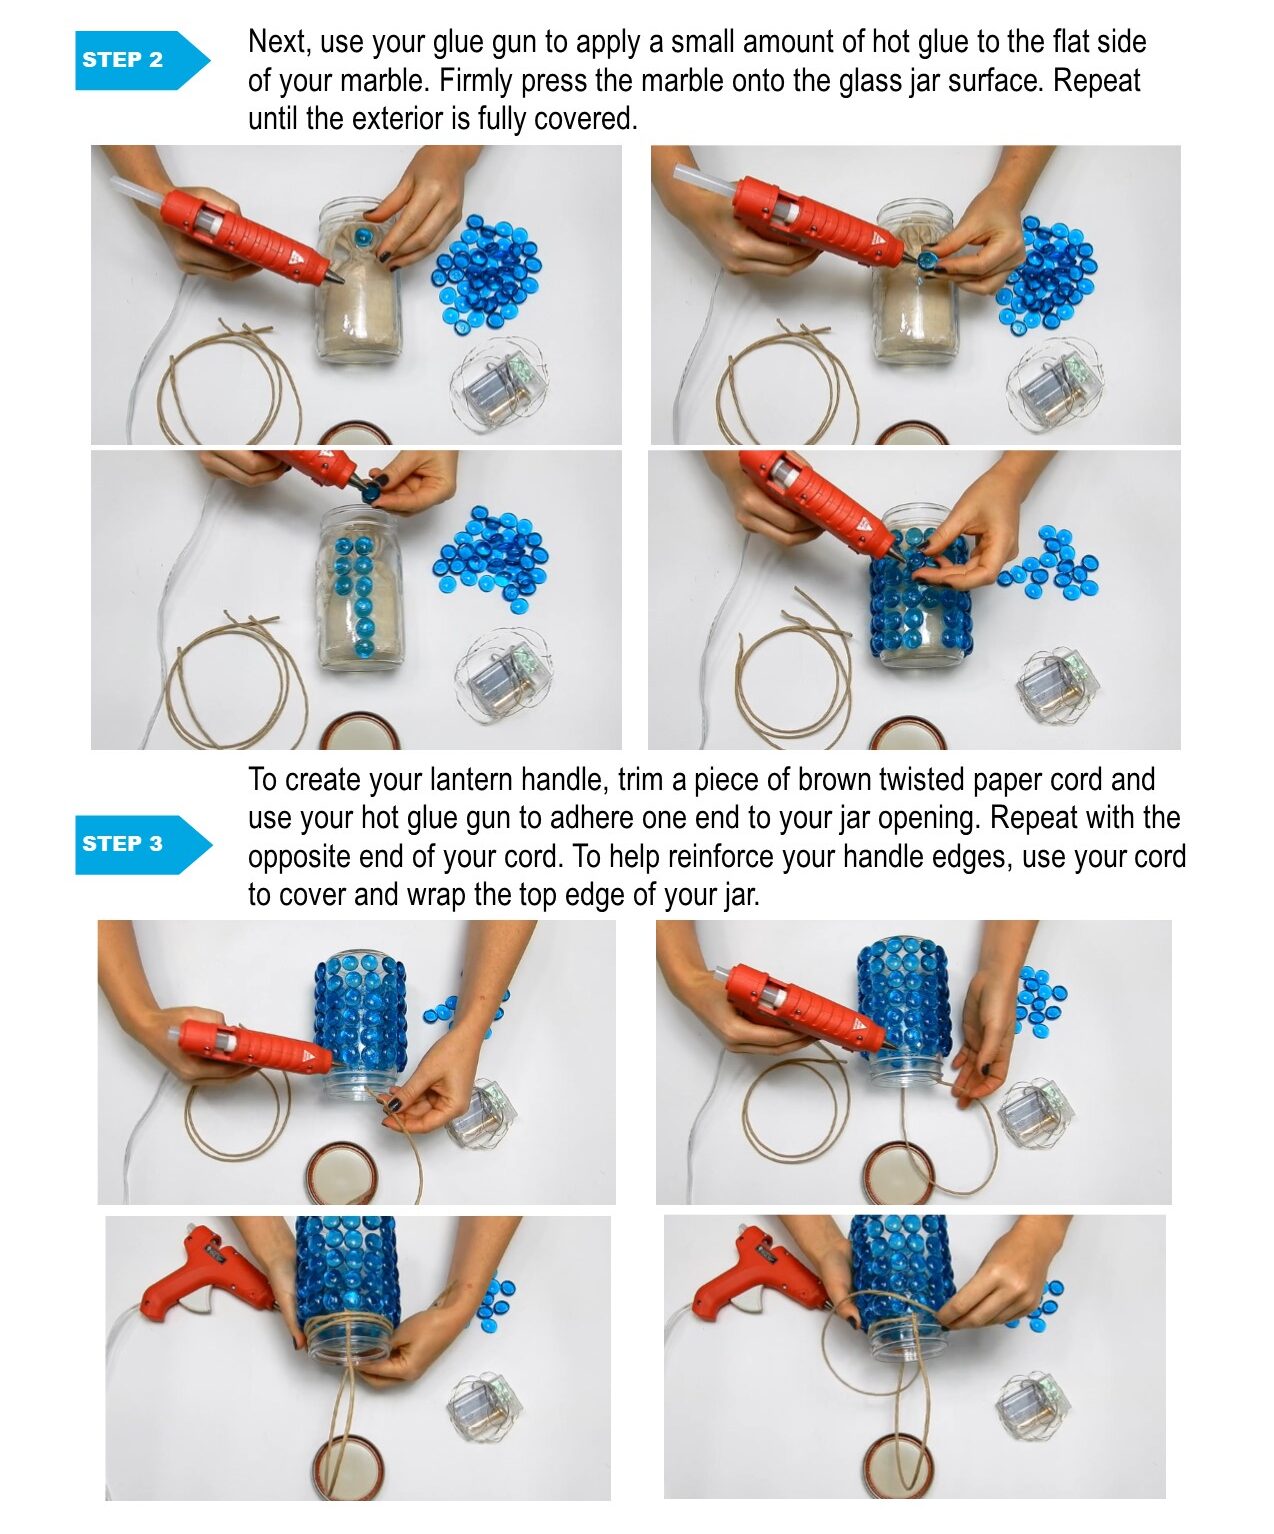
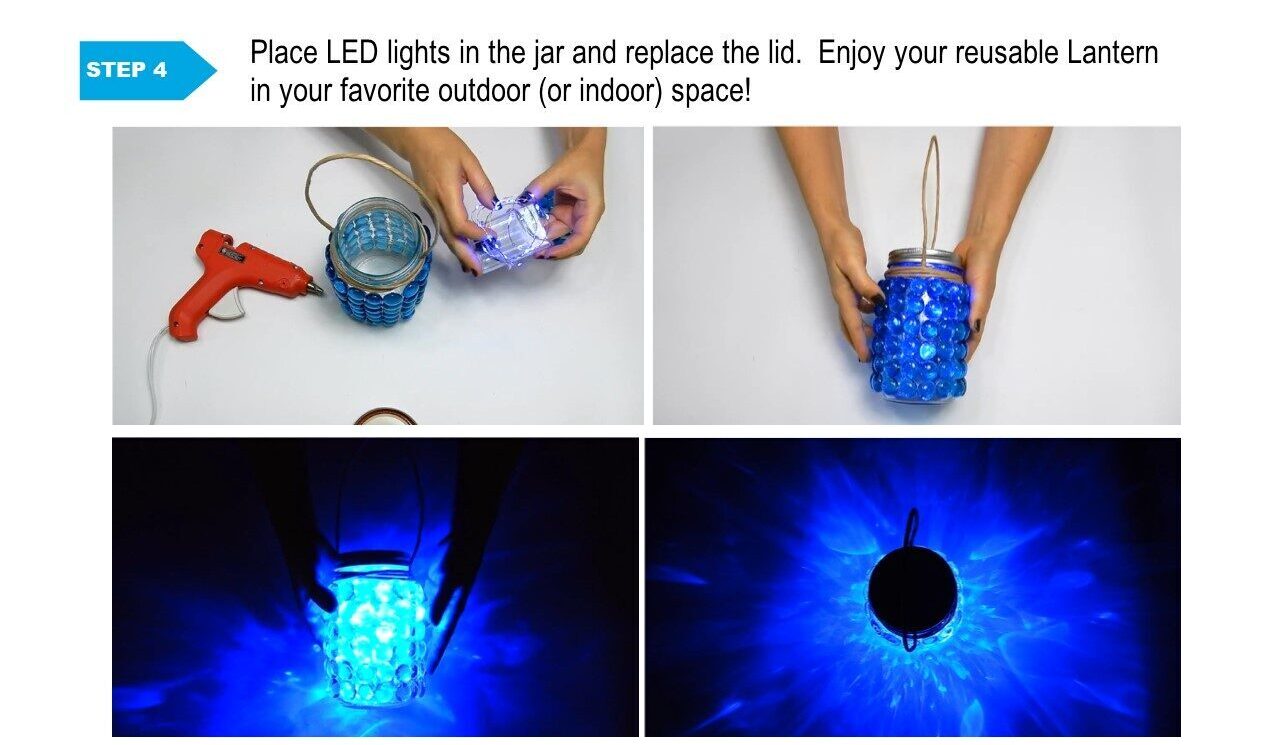
CLICK HERE TO WATCH THE INSTRUCTIONAL VIDEO FROM PAPERMART
EXPLORE OTHER IDEAS FOR MASON JAR PROJECTS:
- https://www.diyncrafts.com/23794/decor/50-brilliantly-decorative-mason-jar-home-decorating-projects
- https://www.purewow.com/home/mason-jar-crafts
- https://www.architectureartdesigns.com/40-easy-things-to-do-with-mason-jars/
- https://www.countryliving.com/diy-crafts/g1821/mason-jars/
- https://masonjarcraftslove.com/
https://www.upcyclist.co.uk/2018/07/art-installations-repurposed/

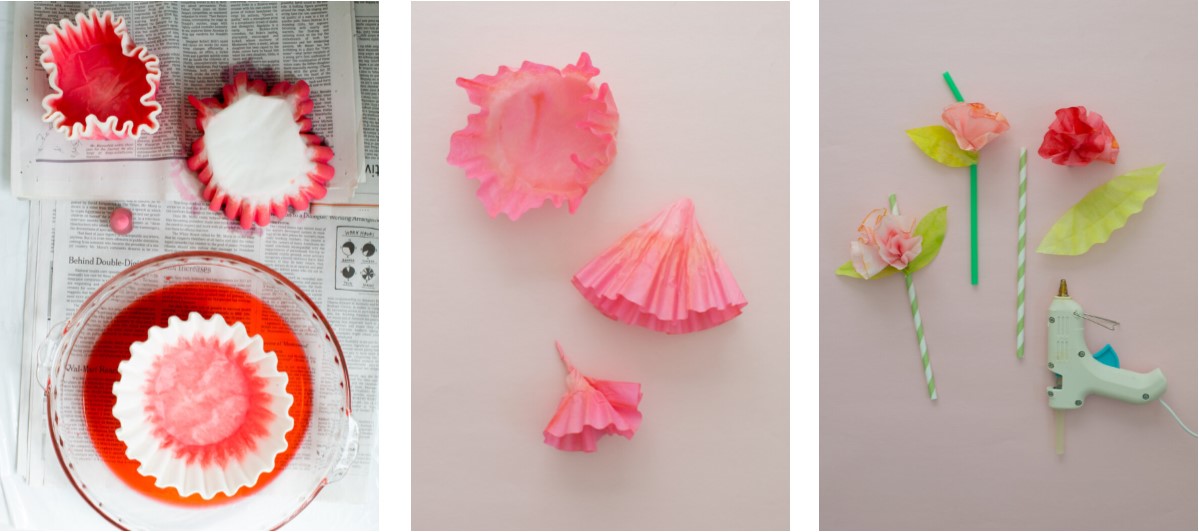
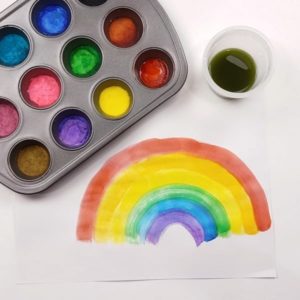
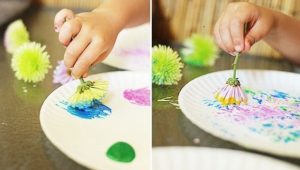
Celebrate Mother’s Day!
Make a beautiful flower bouquet for that special someone using coffee filters & dyes from your pantry.
Here is an easy technique for using goods from your kitchen pantry – CLICK HERE.
![]()
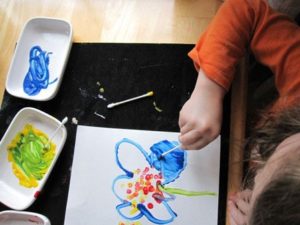
Prepare a dye bath by filling a glass dish with an inch of water. Squeeze a few drops of food coloring in and mix well. Dip a small stack of coffee filters (about 10-15) into the dye bath. You can fully dye them, or dye just the bottom or top half. Leave in for a few seconds, until the dye has spread to your desired effect and remove quickly (so the moisture doesn’t flatten the filters). Dye some in floral colors and a few green for leaves.
![]()
Put the dyed stack on a surface to dry for a few hours – a newspaper-lined tray or flattened box works well.
![]()
To finish, twist the bottom of the filters to create the flower – for instructions, CLICK HERE.
![]()
Make leaves: cut along the edge of a stack of green filters in an arc shape. Fold leaves in half (folding against the ruffles) to make a center “vein”. Hot glue the flowers and stems to a straw, twig, pipe cleaner or floral wire.
Optional : Try these same steps with different teas and spices.
EXPLORE FAMOUS MOTHERS IN ART! CLICK HERE…
https://artsandculture.google.com/story/OwJCSvJQMnBKKg
https://www.dailyartmagazine.com/mothers-in-art/
https://www.huffpost.com/entry/moms-in-art-history_n_572cb522e4b0bc9cb0467c3b
https://www.artsy.net/article/the-art-genome-project-9-famous-mothers-in-art
https://news.artnet.com/art-world/mothers-in-art-history-1832367

Spring marks a time of transition & new beginnings.
The egg has been a symbol of the season since ancient history to present day.
Celebrate Spring & create your own EGGS-traordinary art!
Artist Elisa Sheehan is inspired by the Japanese art of kintsugi & creates art out of broken eggshells.
READ about Elisa Sheehan’s art – https://mymodernmet.com/kintsugi-eggshells-elisa-sheehan
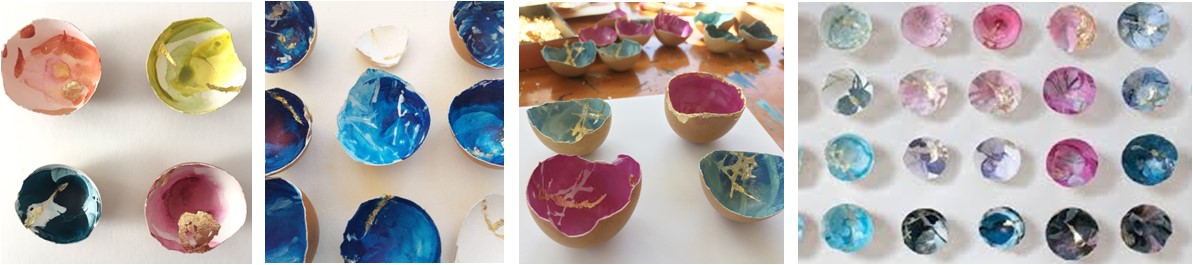
Art & images by Elisa Sheehan
“Translated to ‘golden joinery,’ Kintsugi is the art of repairing cracked pottery with glistening seams of gold. Though the practice dates back to the 15th century, contemporary artists are constantly finding new ways to reimagine the centuries-old craft, from pieced-together pavements to patchwork chopstick holders. One adaptation that captures the symbolic spirit of the practice is Kintsugi Eggshells, an ongoing collection of exquisite installations by Elisa Sheehan.”
READ Kinsugi – click here
READ Symbolism of the Egg – click here
INSTRUCTIONS – how to prepare your eggshells for painting
Step 1 Split the egg horizontally or vertically & remove egg. Soak the shells in hot water & dish soap for 15 minutes & allow to dry thoroughly.
Step 2 Remove the dried membrane from inside of eggshell by peeling or sweeping a bristle brush over it. This step is important so the membrane does not detach later with the paint.
Step 3 Paint your egg with acrylic paint, inks and/or gold leaf.
![]()

L-R: Claes Oldenburg, Sculpture in the Form of a Fried Egg, 1966; Salvador Dali, Dali House in Portilligat, Cadaques, Spain; Andy Warhol, Multicolored Eggs, 1982
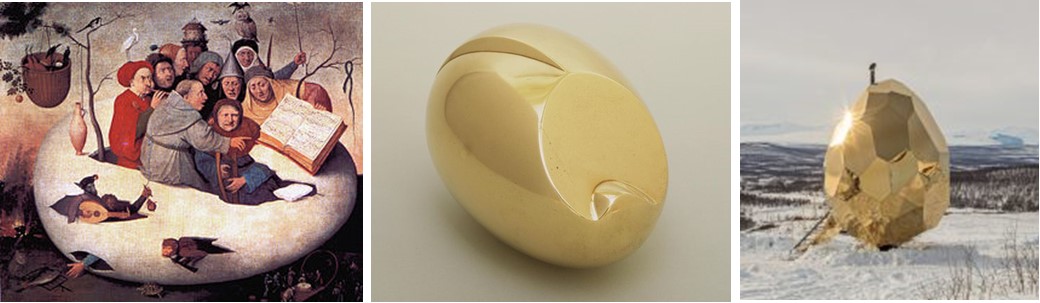
L-R: Hieronymus Bosch, Concert in the Egg, 1561; Constantin Brancusi, Newborn, Version 1, 1920; Egg shaped sauna, Sweden
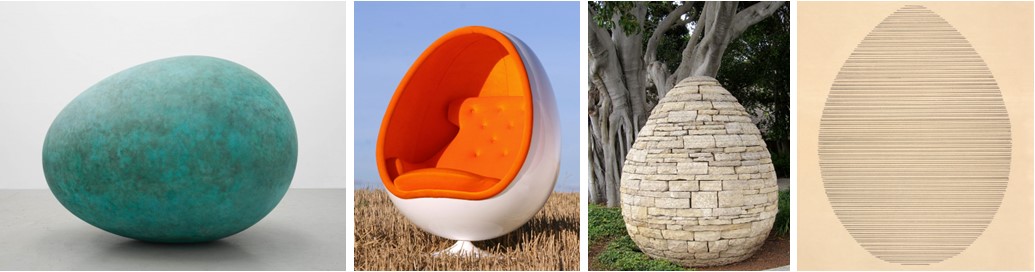
L-R: Gavin Turk, Oeuvre (Verdigris), 2018; Henrik Thor-Larsen, Ovalia, Egg Chair; Andy Goldsworthy, Stone Egg Sculpture; Agnes Martin, The Egg, 1963
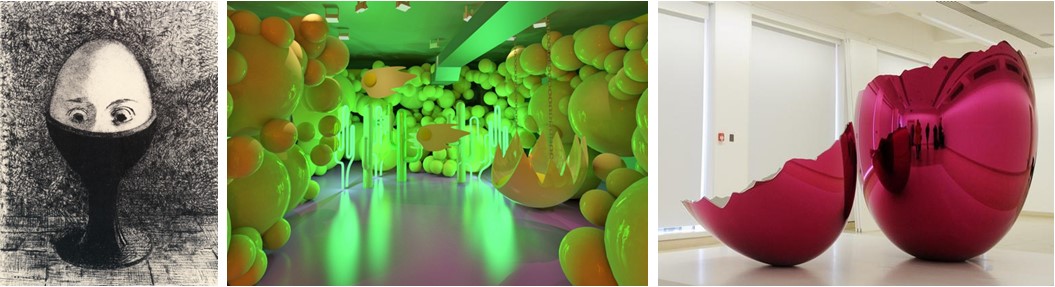
L-R: Odilon Redon, The Egg, 1885; Egg House Art Installation, NYC,2018; Jeff Coons, Cracked egg
CLICK HERE TO WATCH A VIDEO ABOUT COONS’S CRACKED EGG

https://www.metmuseum.org/art/collection/search/283095
https://www.metmuseum.org/art/collection/search/283095
https://www.mynreorleans.com/visions-of-early-rampart-street/
WATCH
https://www.exibartstreet.com/news/life-through-the-lens-margaret-bourke-white/
https://www.theatlantic.com/photo/2019/08/photography-of-margaret-bourke-white/596980/
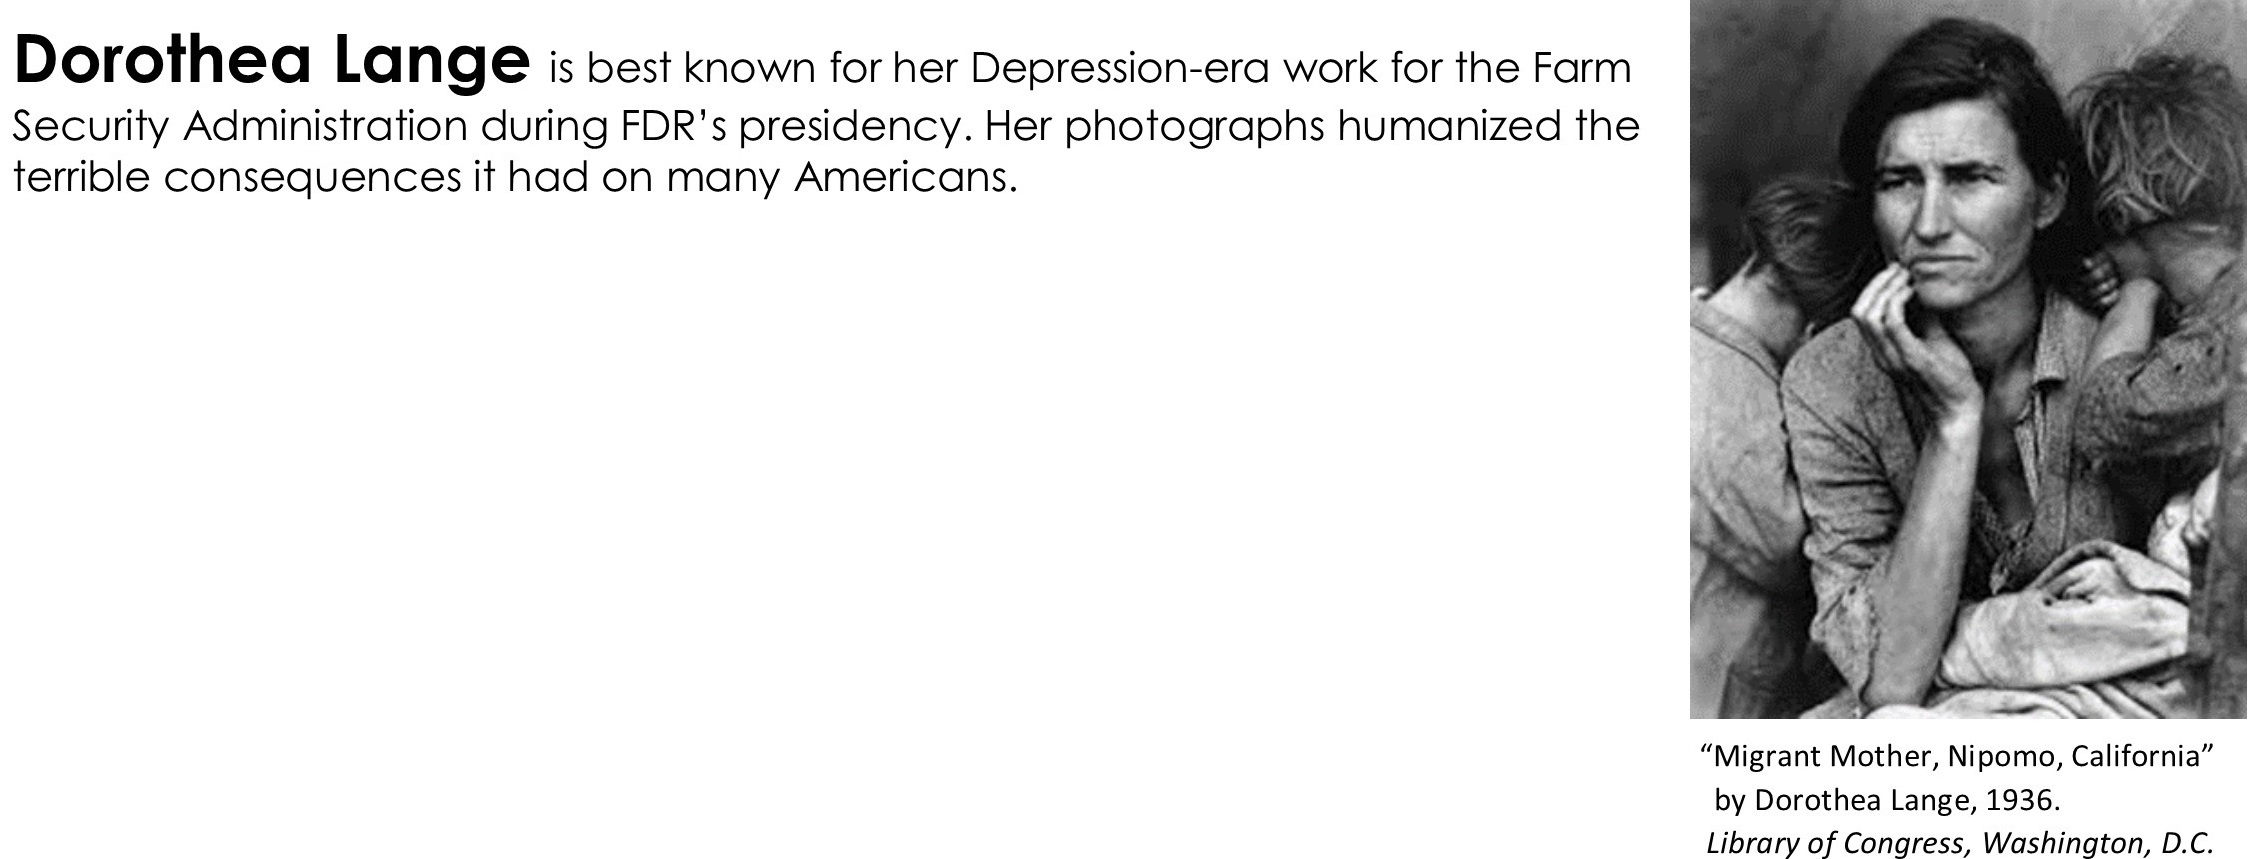
WATCH
https://www.moma.org/artists/3373
https://www.pbs.org/wnet/americanmasters/dorothea-lange-about-the-film/3096/
Email an image of your art/photography with a title and your name – we will share it on the BBAC website.
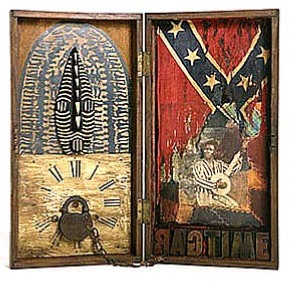
Betye Saar
“It is my goal as an artist to create works that expose injustice & reveal beauty.
The rainbow is literally a spectrum of color while spiritully a symbol of hope & promise.”
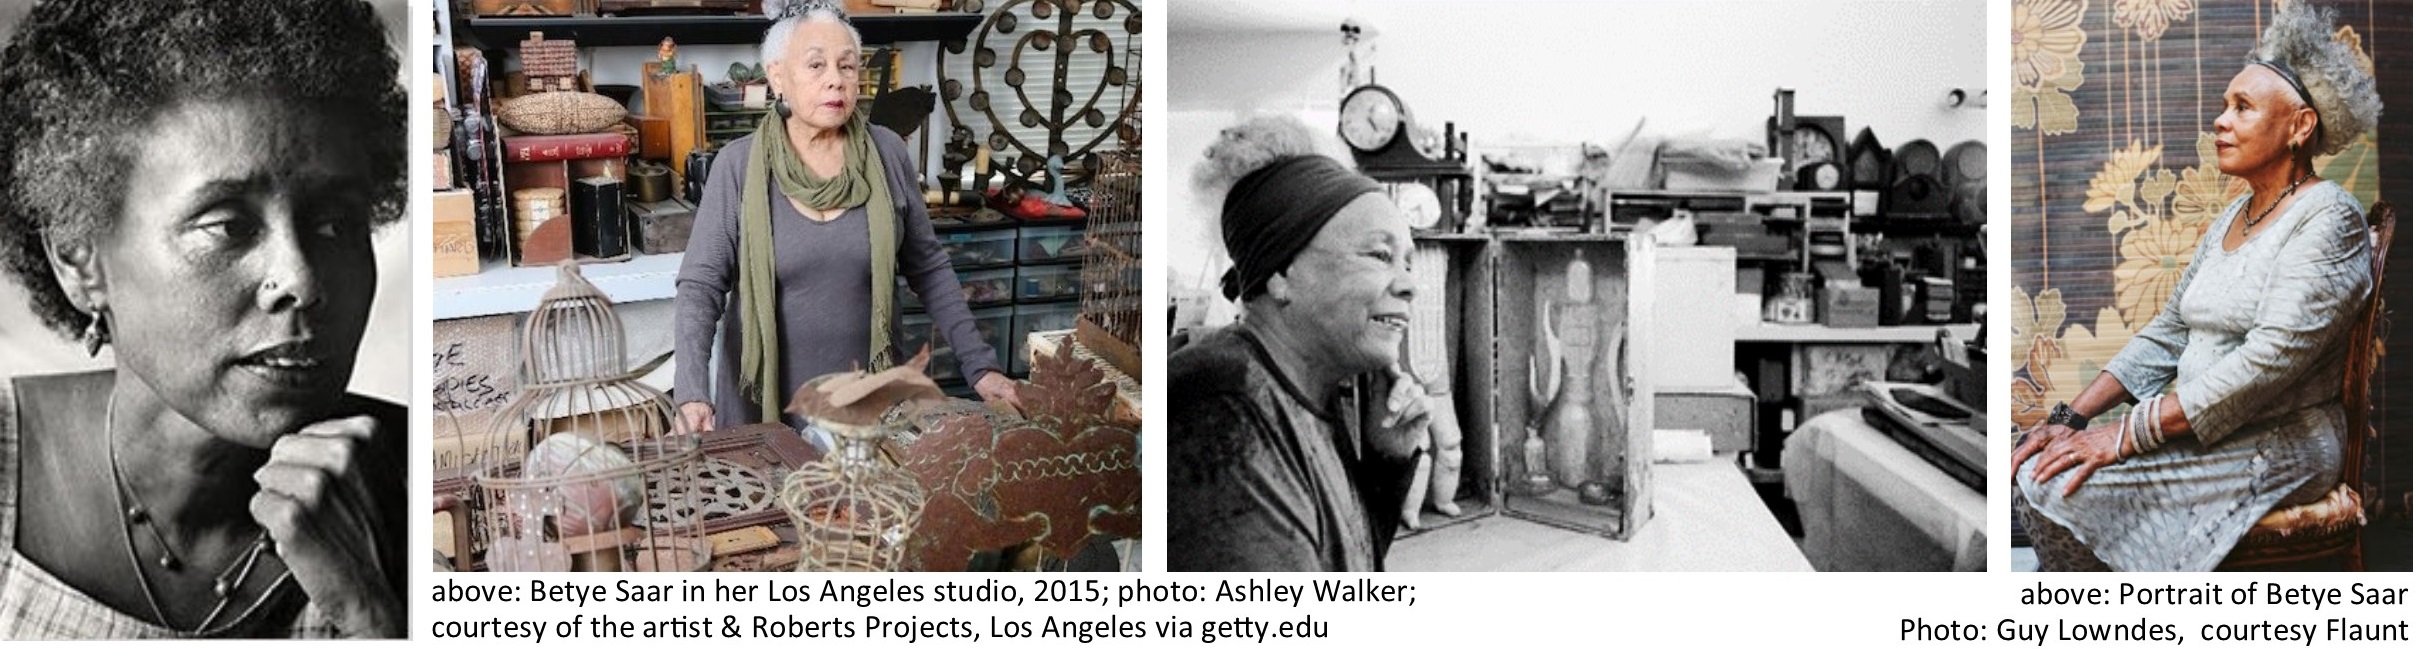
“Los Angeles–based artist Betye Saar (b. 1926) emerged in the 1960s as a major voice in American art. Part of a wave of artists, many of them African American, who embraced the medium of assemblage, she is known best for incisive collages and assemblage sculptures that confront and reclaim racist images. The daughter of a seamstress, and a printmaker by training, Saar brings to her work a remarkable sensitivity to materials. Her imagery is drawn from popular culture, family history, and a wide range of spiritual traditions”.
Published on The Morgan Library & Museum (https://www.themorgan.org)
Follow the link below to view the Betye Saar exhibition at the Morgan Library & Museum
Betye Saar: Call and Response (September 12, 2020 – January 31, 2021)
https://www.themorgan.org/exhibitions/betye-saar?

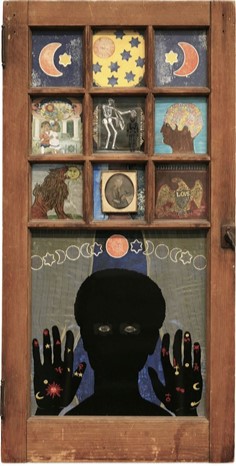
Betye Saar – Black Girl’s Window, 1969
https://www.moma.org/collection/works/167631
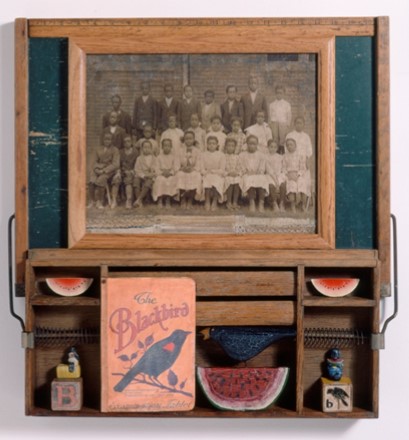
Betye Saar – Blackbird, 2002
https://www.pafa.org/museum/collection/item/blackbird
Betye Saar – Ragtime, 2005

READ
https://www.nytimes.com/2019/09/04/arts/design/betye-saar.html
https://www.latimes.com/entertainment/arts/miranda/la-ca-cam-betye-saar-20160501-story.html
https://www.altaonline.com/culture/art/a5738/betye-saars-solo-debut-at-lacma/
WATCH
https://www.youtube.com/watch?v=isxEBXu23J0
https://www.youtube.com/watch?v=T7CFz9xzhIM

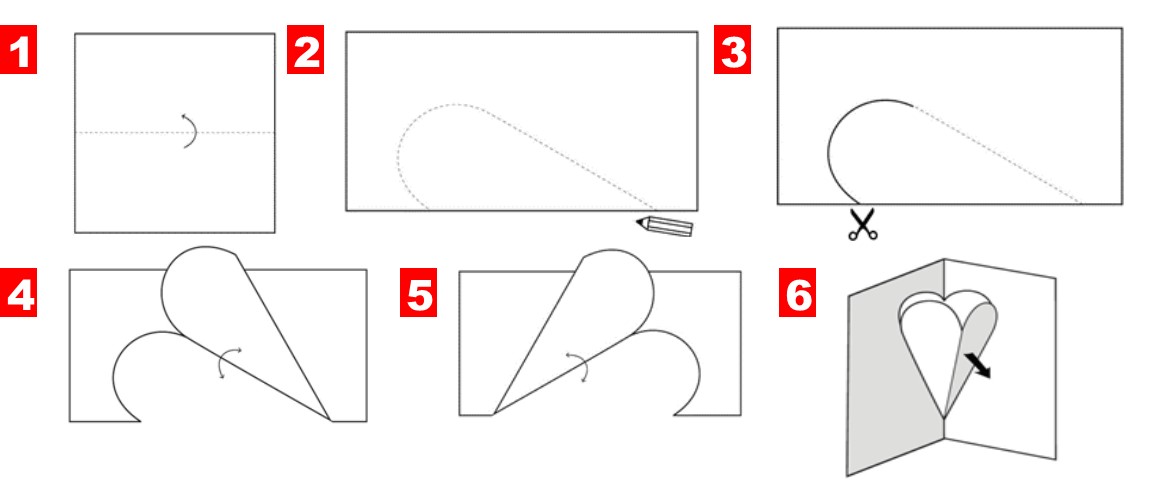
- Start by gathering small found objects that you find interesting. The objects may have a special meaning to you & tell a story through memories & symbols.
- Cut-out interesting pictures & words from old newspapers & magazines.
- Find a discarded box or piece of cardboard & begin to arrange your objects, pictures & words inside and/or around the surface of the box.
- Once you have arranged your objects in your desired composition, adhere them with glue to create your assemblage.
Need some help getting started?
Here are some tips & techniques from the Artists Network –
https://www.artistsnetwork.com/art-techniques/technique-tuesdays-10-tips-for-assemblage/
HeART Challenge

Celebrate Valentine’s Day with Pop Art
Pop Art is art based on modern popular culture & the mass media, especially as a critical or ironic comment on traditional fine art values. Click here for more info.
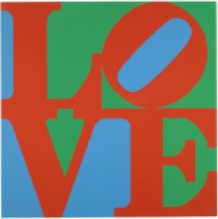
by Robert Indiana…
https://www.moma.org/collection/works/68726
http://robertindiana.com/works/love-2/
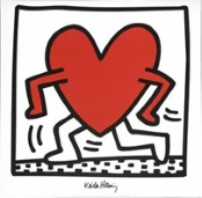
by Keith Haring…
https://www.tate.org.uk/kids/explore/who-is/who-keith-haring
by Jim Dine…
https://www.youtube.com/watch?v=n7SWRa1gvfc
https://www.artsy.net/article/editorial-why-jim-dine-is-the-undisputed-king

by Andy Warhol…
https://www.youtube.com/watch?v=o8Va9Y_rlNg
https://www.warhol.org/andy-warhols-life/
FROZEN CREATIVITY!
MAKE SNOW PAINT
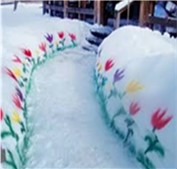
A blanket of snow is the perfect canvas for a winter art activity! This simple homemade paint recipe is made from only three ingredients.
SUPPLIES:
2 Tbs cornstarch; 2 C water; Empty spray bottles; Liquid food coloring*; Bowl; Spoon; Funnel for pouring paint in spray bottles
* Food coloring can stain hands & fabric – adult supervision required when mixing the paint
- Mix the cornstarch & water together until it looks like milk. It will feel thick at the bottom until all the cornstarch is mixed in.
- Add the food coloring & stir.
- Carefully pour the mixture into the spray bottle.
- Repeat for different colors.
Optional: Try this activity using paintbrushes & cookie cutters. Use sticks to frame your art.
Kids will love creating designs in the snow & adding color to their snowmen.

MAKE AN ICY SUNCATCHER!
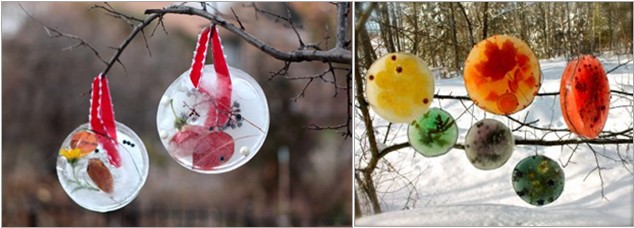
SUPPLIES:
Container to freeze the water in – aluminum pie plate, cake pans, plastic food storage containers
Natural elements – twigs, leaves, berries, pinecones, fruits, flowers
Water
Hanger – twine, yarn, or ribbon
INSTRUCTIONS:
- Pour an inch or more of water into the container – food coloring can be added for color
- Arrange the natural elements in the water
- Cut the twine or ribbon (4-5”) & set it at the edge to create a hanger
Weather permitting, place the container outside or in your freezer
Once the water is completely frozen, pop the suncatcher out of the container & hang it outside

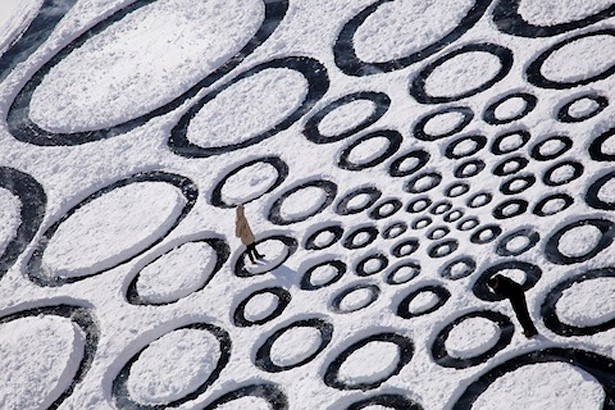
Art Under 32-Degrees!
Artists create sculptures with snow & ice.
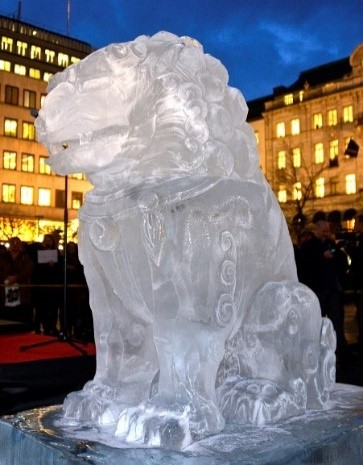
Ice sculpture by Ai Weiwei during Stockholm International Film Festival 2014
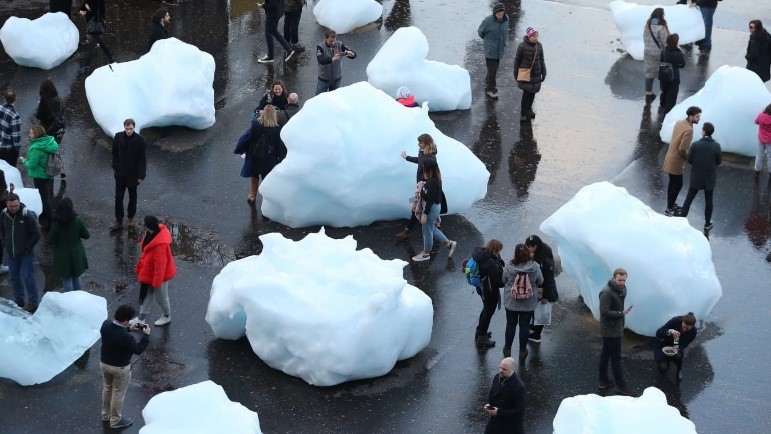
Twenty-four melting iceberg pieces were placed in front of the Tate Modern museum in London by Scandinavian artist Olafur Eliasson, as an expression of Arctic ice & global warming.

Brazilian artist Nele Azevedo’s ice people: 1,000 small sitting figures made from ice.
Jim Denevan’s mission: to create the world’s largest work of art on the world’s largest lake in Siberia. Nine square miles of art chiseled into ice.
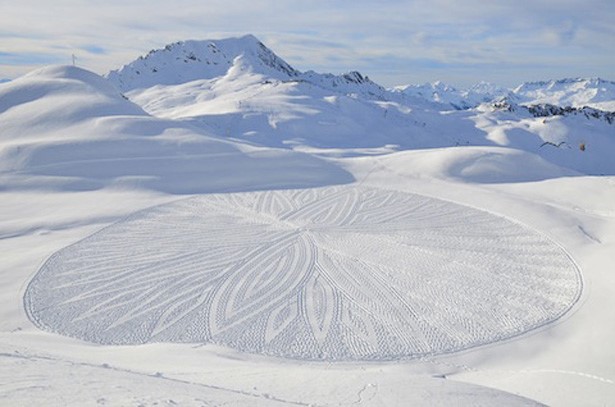
Artist Simon Beck creates intricate patterns by tromping in snowshoes through freshly fallen powder in Les Arcs, a ski resort in France.
WATCH: https://www.youtube.com/watch?v=pVWoOBEtE2M
https://www.mountainlifemedia.ca/2014/10/powder-opus-snow-artist-simon-beck/

Stackhouse by Anish Kapoor, Winnipeg river trail
WATCH: https://www.cbc.ca/news/canada/manitoba/anish-kapoor-warming-hut-stackhouse-ice-winnipeg-1.3976368

Timo Jokela – snow art installations, Lapland Finland
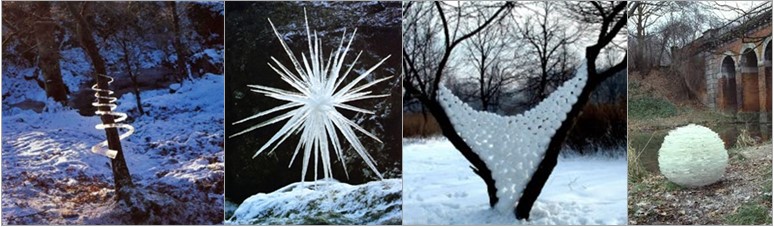
Andy Goldsworthy – ice & snow sculptures


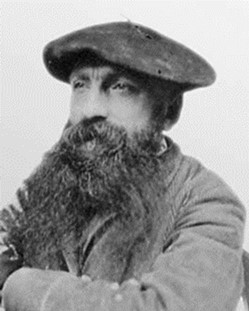
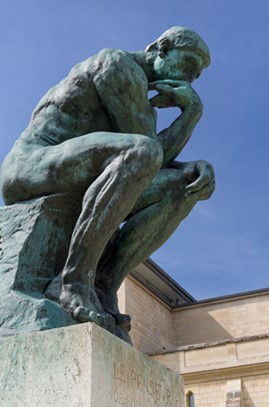
Auguste Rodin (born November 12, 1840) was a French artist widely regarded as the father of modern sculpture. Known for his expressive depictions of the human form in bronze & marble, Rodin is responsible for such iconic works as The Kiss (c. 1882) & The Thinker (1902). Today his work can be found in institutions around the world, including multiple museums dedicated to his art such as the Rodin Museum in Philadelphia & the Musée Rodin in Paris. http://www.artnet.com/artists/auguste-rodin/

There are many “The Thinker” sculptures around the world & one is located at the Woodward Avenue entrance of the Detroit Institute of Arts!
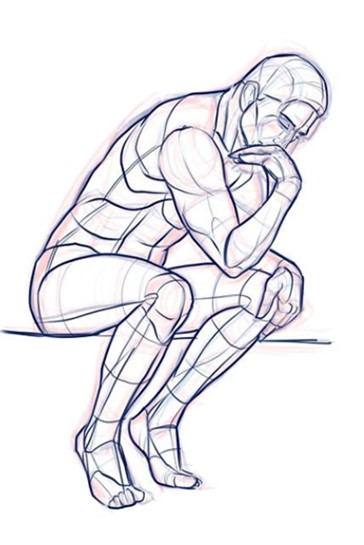
WATCH: How to Draw The Thinker
https://www.youtube.com/watch?v=bkyw3R1ZwZ4
READ: About Rodin’s The Thinker
https://www.nga.gov/collection/art-object-page.1005.html
WATCH: About Rodin’s The Thinker
https://www.youtube.com/watch?v=GSIVxSRsF20
READ: More about Rodin – 12 things maybe you didn’t know about The Thinker
https://www.mentalfloss.com/article/62424/12-things-you-didnt-know-about-thinker
WATCH: More about Rodin
https://www.youtube.com/watch?v=Oh4xXYAZPtA
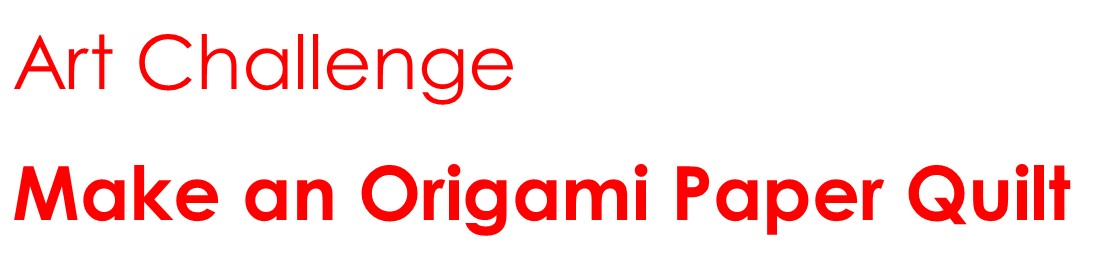

TUTORIALS
https://www.thesprucecrafts.com/origami-quilt-wall-art-4129157
https://www.youtube.com/watch?v=pRqFODSWzKc
PROFESSIONAL ORIGAMI ARTISTS & THEIR CREATIONS
Extreme Origami: https://www.vice.com/en/article/qkwkmv/8-artists-pushing-origami-to-the-extreme
From the Japanese American National Museum: http://www.janm.org/exhibits/foldingpaper/artists/
“The Modern Life of Origami, an Art as Old as Paper”: https://www.nytimes.com/2019/11/22/arts/design/modern-origami-art.html


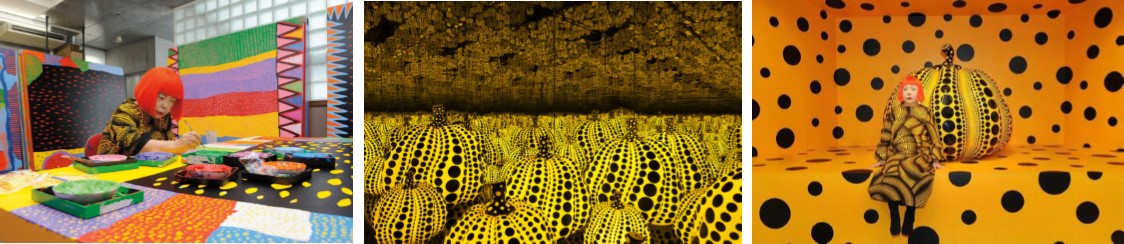

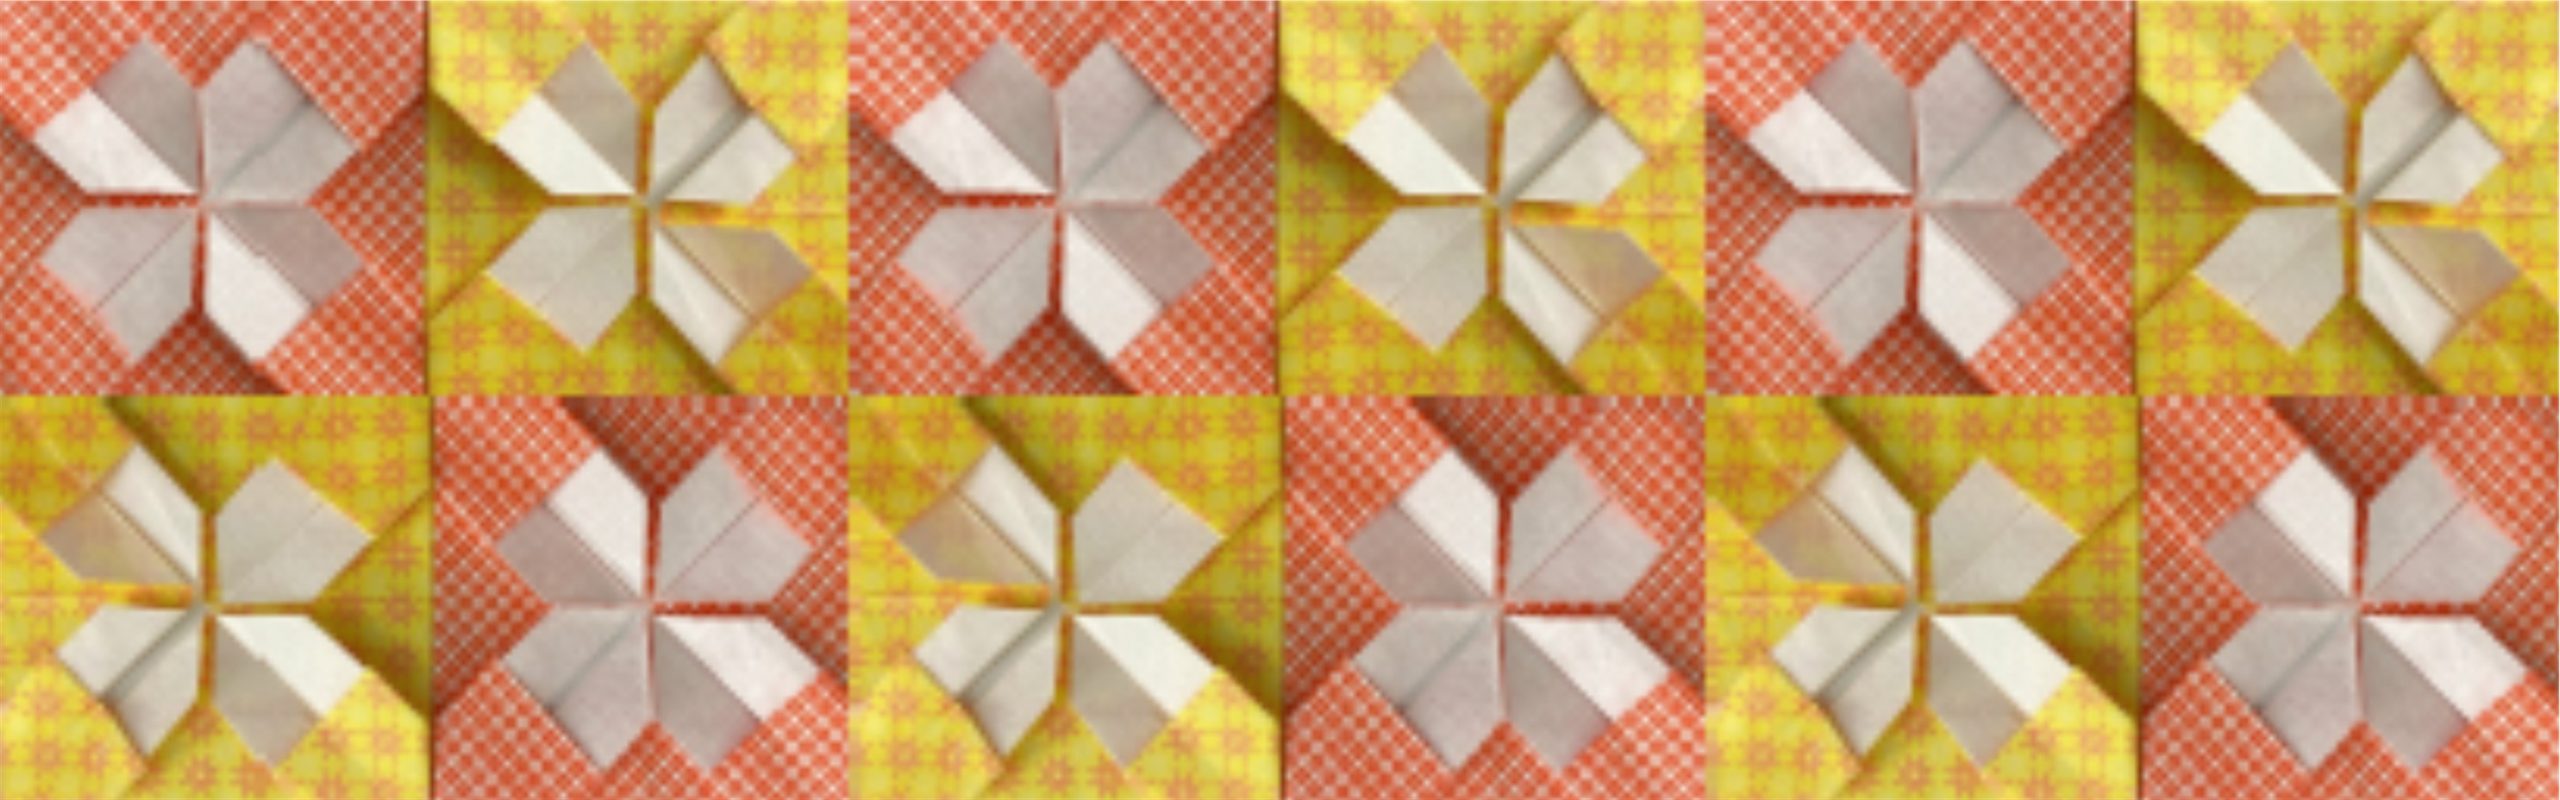
https://mymodernmet.com/yayoi-kusama-pumpkins/
![]()
https://www.phillips.com/article/38253410/behind-yayoi-kusamas-signature-pumpkins


https://www.youtube.com/watch?v=GUoDUhsWJL8

https://www.brit.co/painted-pumpkin-diy-yayoi-kusama/


Vincent, Frida & Mona…oh my!

Check out these links for great artist-inspired costume ideas…for all ages!
- https://theculturetrip.com/north-america/usa/articles/13-halloween-costume-ideas-inspired-by-the-art-world/
- https://artzealous.com/10-art-inspired-halloween-costume-ideas/
- https://realismtoday.com/8-fun-halloween-costume-ideas-for-artists/
- https://hyperallergic.com/408839/from-boschs-bird-to-kusamas-spots-arty-halloween-costumes/
Explore these masterpieces online… (warning – subject matter may be scary for young children)
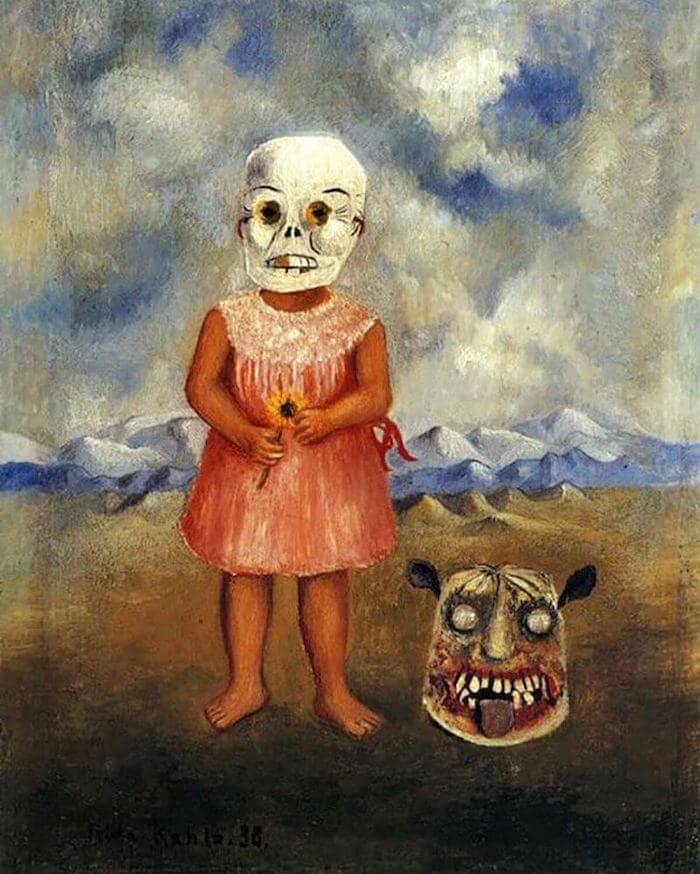
Above: Frida Kahlo’s Girl with Death Mask (She Plays Alone), 1938
Caravaggio, Medusa, 1597
Caravaggio, David with the Head of Goliath, 1606-1607
Henri Fuseli, The Nightmare, 1781
William Blake, The Ghost of a Flea, 1819-1820
Katsushika Hokusai, The Ghost of Kohada Koheiji, 1830
James Ensor, Skeletons Fighting over a Pickled Herring, 1891
Edvard Munch, The Scream, 1891
Odilon Redon, Smiling Spider, 1892
Henryk Weyssenhoff, Premonition, 1893
Paul Cézanne, Pyramid of Skulls,1901
Salvador Dali, The Face of War, 1940
Aksel Waldemar Johannessen, The Night, 1920
Francis Bacon, Study after Velazquez’s Portrait of Innocent X, 1953

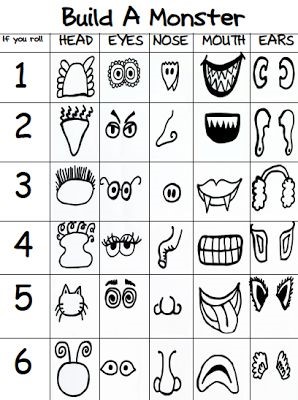
CLICK HERE to download & print that scary form!
Grab some dice, paper & a pen or pencil… Watch this video for all the clues! https://www.youtube.com/watch?v=uDY1a8UES4E
(No dice? Write the numbers 1 through 6 on pieces of paper, turn them face-down & pick one when it’s your turn.)
Fall Photo Art Challenge
Winter is an etching, spring a watercolor, summer an oil painting and autumn a mosaic of them all. — Stanley Horowitz
Fall colors peak in southeast Michigan this week and next. Capture the beauty of the season through photography & email your favorite image to the BBAC. Include your name, email and phone number and you will be automatically entered into a drawing for a $100 BBAC Community Membership; scroll down for details. Some of the photo entries will be shared on BBAC social media and website.
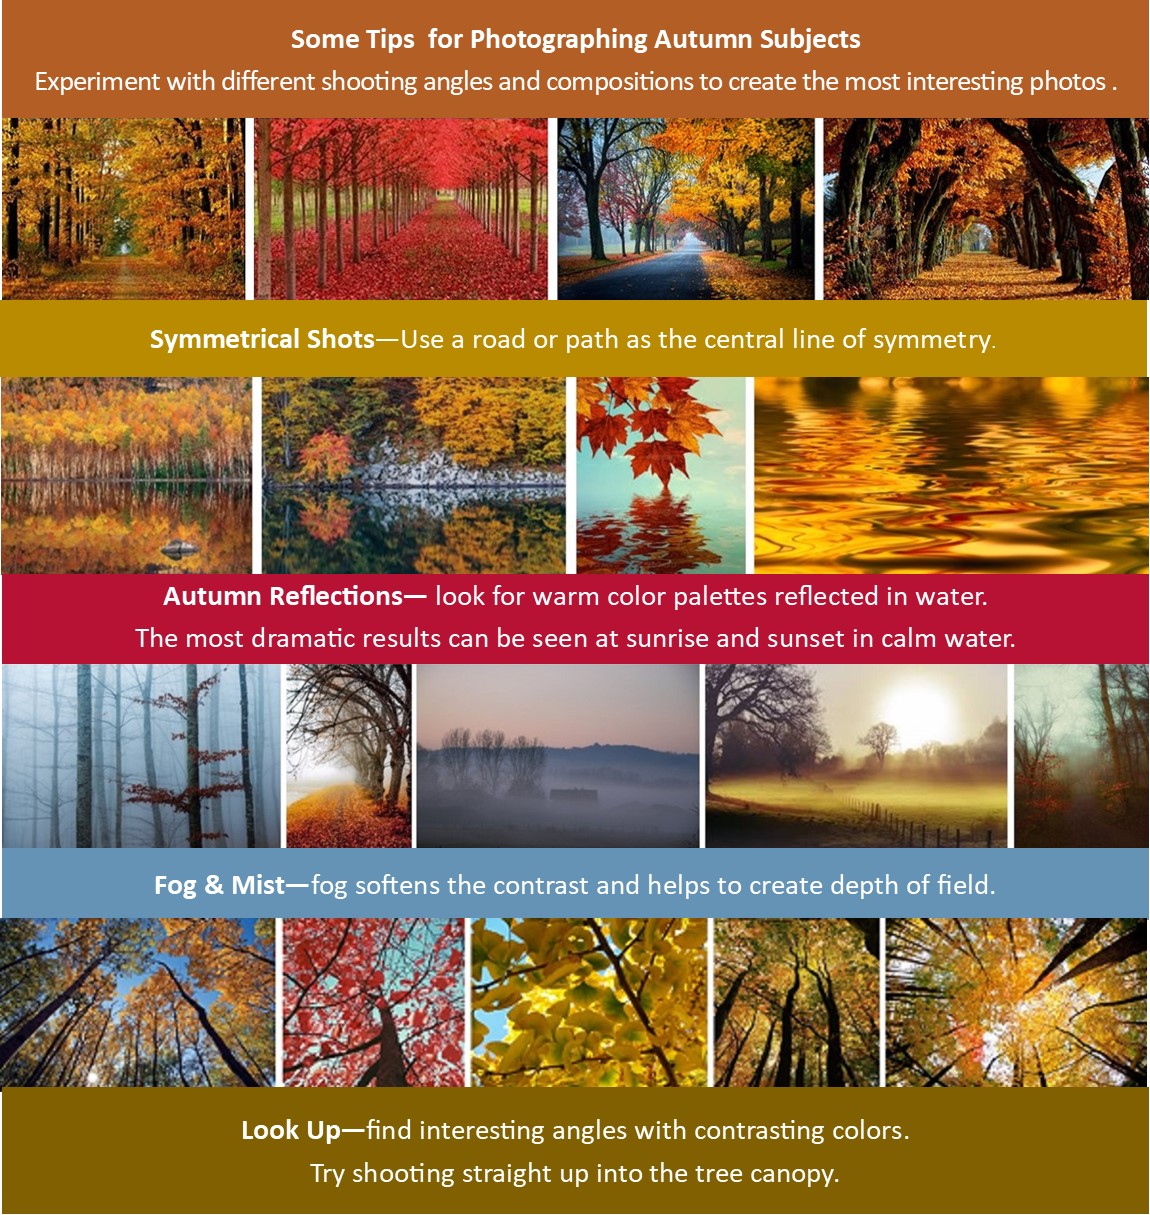
Email your images by October 25 to: info@BBArtCenter.org – the drawing will be on October 26 & the winner will be notified by email.Th BBAC Community Membership includes Early Bird registration, tuition discounts, 8 complimentary passes to Sundays @ the Center & a 10% discount on all exhibition and Gallery Shop purchases (not applicable to Holiday Shop).
Painted Leaves
Start collecting fall leaves & let their shapes & colors inspire your creative side.

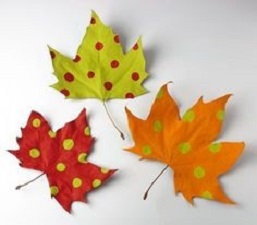
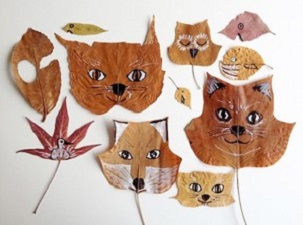
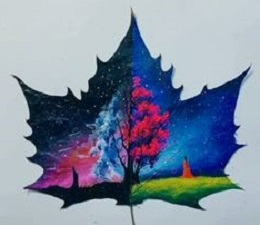
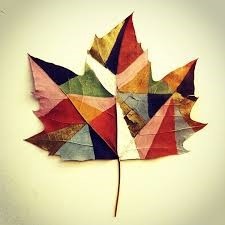
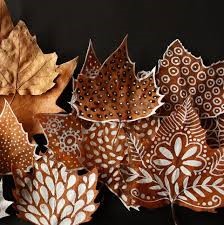
From simple designs to highly detailed realistic paintings, painted leaves can be framed, made into garlands, unique ornaments, gift tags & more.
Place your dry leaves under a heavy book until the surface is flat enough to paint on.
Paint the leaves with acrylic paint or acrylic paint markers. Acrylic paint is a fast-drying paint made of pigment suspended in acrylic polymer emulsion. The paint will become water resistant when it is dry & will protect & preserve the leaf.
Americans for the Arts has created a social media campaign designed to promote awareness & celebrate the arts & humanities during this month. A different theme for art is slated for each day in October (see above).
Showcase your work on both the BBAC Instagram & Americans for the Arts Instagram… Let’s see how many BBAC artworks get recognized!
And that’s your art challenge for this week!
-
BBAC Instagram: #BBACArtChallenge
-
Americans for the Arts Instagram: #showyourart2020
(be sure to tag @americans4arts for they don’t miss them)
For more about the “Show Your Art” campaign, click here.
Autumn Art Hike
Greet the first week of Autumn with an art hike! Adults & kids alike will love making art while exploring the great outdoors! For this art challenge, you will need pencils, crayons, & drawing paper.
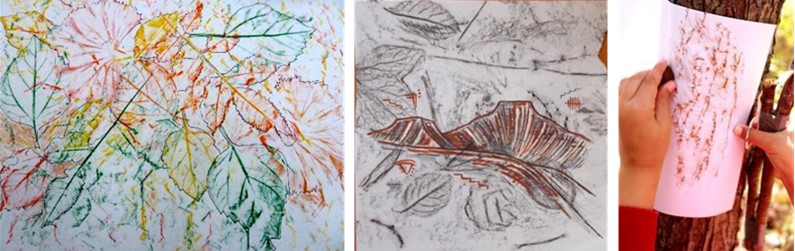
• Create art from nature using the frottage technique.
Frottage (French: “rubbing”) is done by lying a thin sheet of paper on a textured surface & gently rubbing over it with a soft pencil or crayon to highlight the textures. How many different textures can you find on your hike? Fill your paper with rubbings from leaves, tree bark, rocks, feathers, & more.
Frottage was developed by surrealist artist Max Ernst in 1925. Ernst transformed his rubbings into images of strange & fantastic landscapes, objects & creatures. He published a collection of this work in 1926 titled Histoire Naturelle (natural history). Try creating your own unique collage using the rubbings you collected on your art hike.
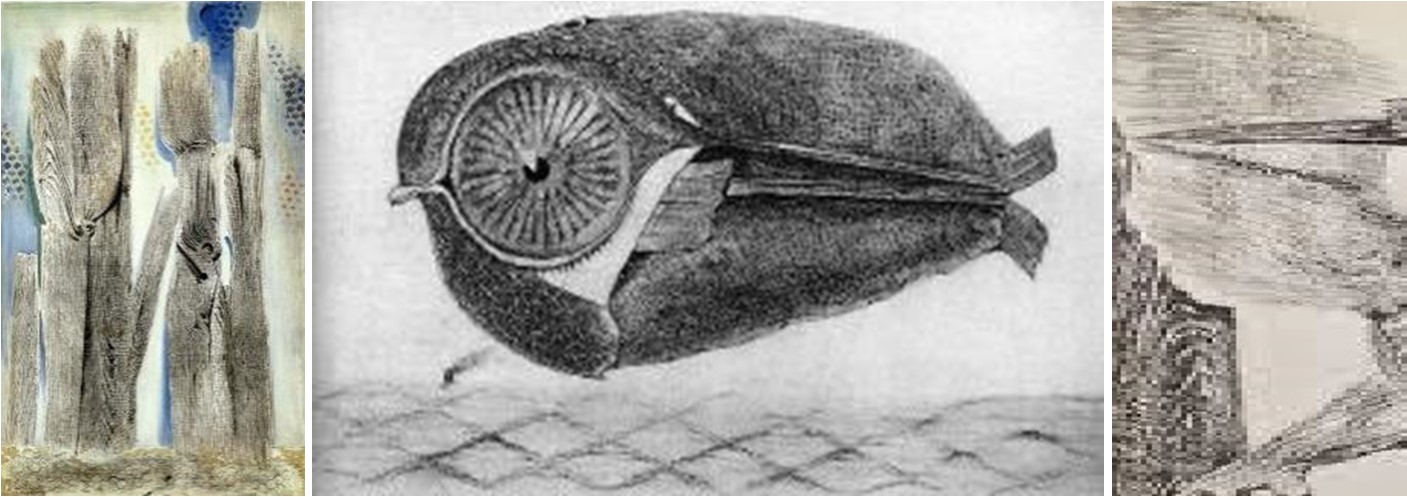
Art by Max Ernst (L-R): The Blue Forest; The Fugitive; The Origin of the Clock
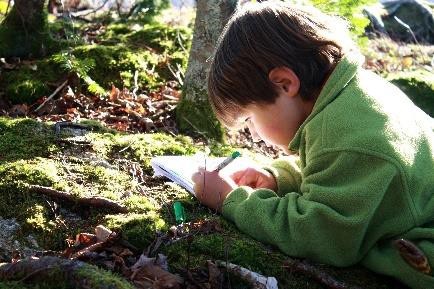
• Take a break on your hike & do some sketching en plein air.
Plein air is a French term that means “in the open air” & is used by artists to describe the act of painting outdoors, capturing landscapes & views in natural light. Drawing from nature encourages keen observation & is a wonderful learning experience for children. Have your young art explorers count leaves & petals, look at positive & negative space & make comparisons between shape, proportion & texture.
More about Plein Air –
https://www.metmuseum.org/toah/hd/lafr/hd_lafr.htm
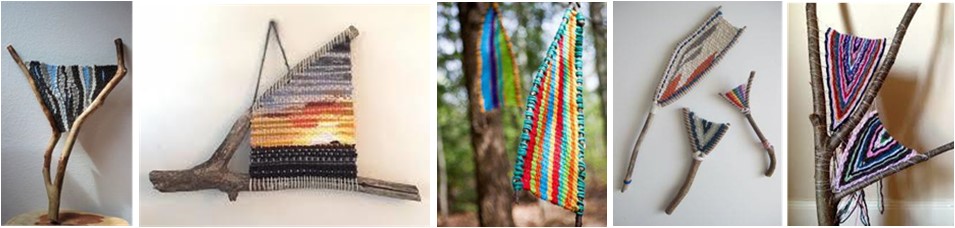
• Make a Branch Weaving
Find a y shaped stick on your hike. Here are a few examples & easy video instructions for setting up your loom & weaving at home.
Homage to the Apple
“I will astonish Paris with an apple.” – Paul Cézanne
Win a BBAC $100 Community Membership!
Enter the Apple Art Match by September 23 to be included in a drawing for a free $100 BBAC Community Membership.
The Community Membership is valid for all family members residing at the same address and includes: Early Bird Registration, tuition discounts, 10% discount on all exhibition & Gallery Shop purchases and 8 complimentary passes to Sundays @ the Center.
-Match the number on the artwork with the title/artist.
-Email your answers by September 23 to: Info@BBArtCenter.org
-Include your name, address, email and phone number.
-The Apple Art Match drawing will be held on September 25 and you will be notified by email if your name was selected.
CLICK THE GRAPHIC BELOW FOR A LARGER VERSION.
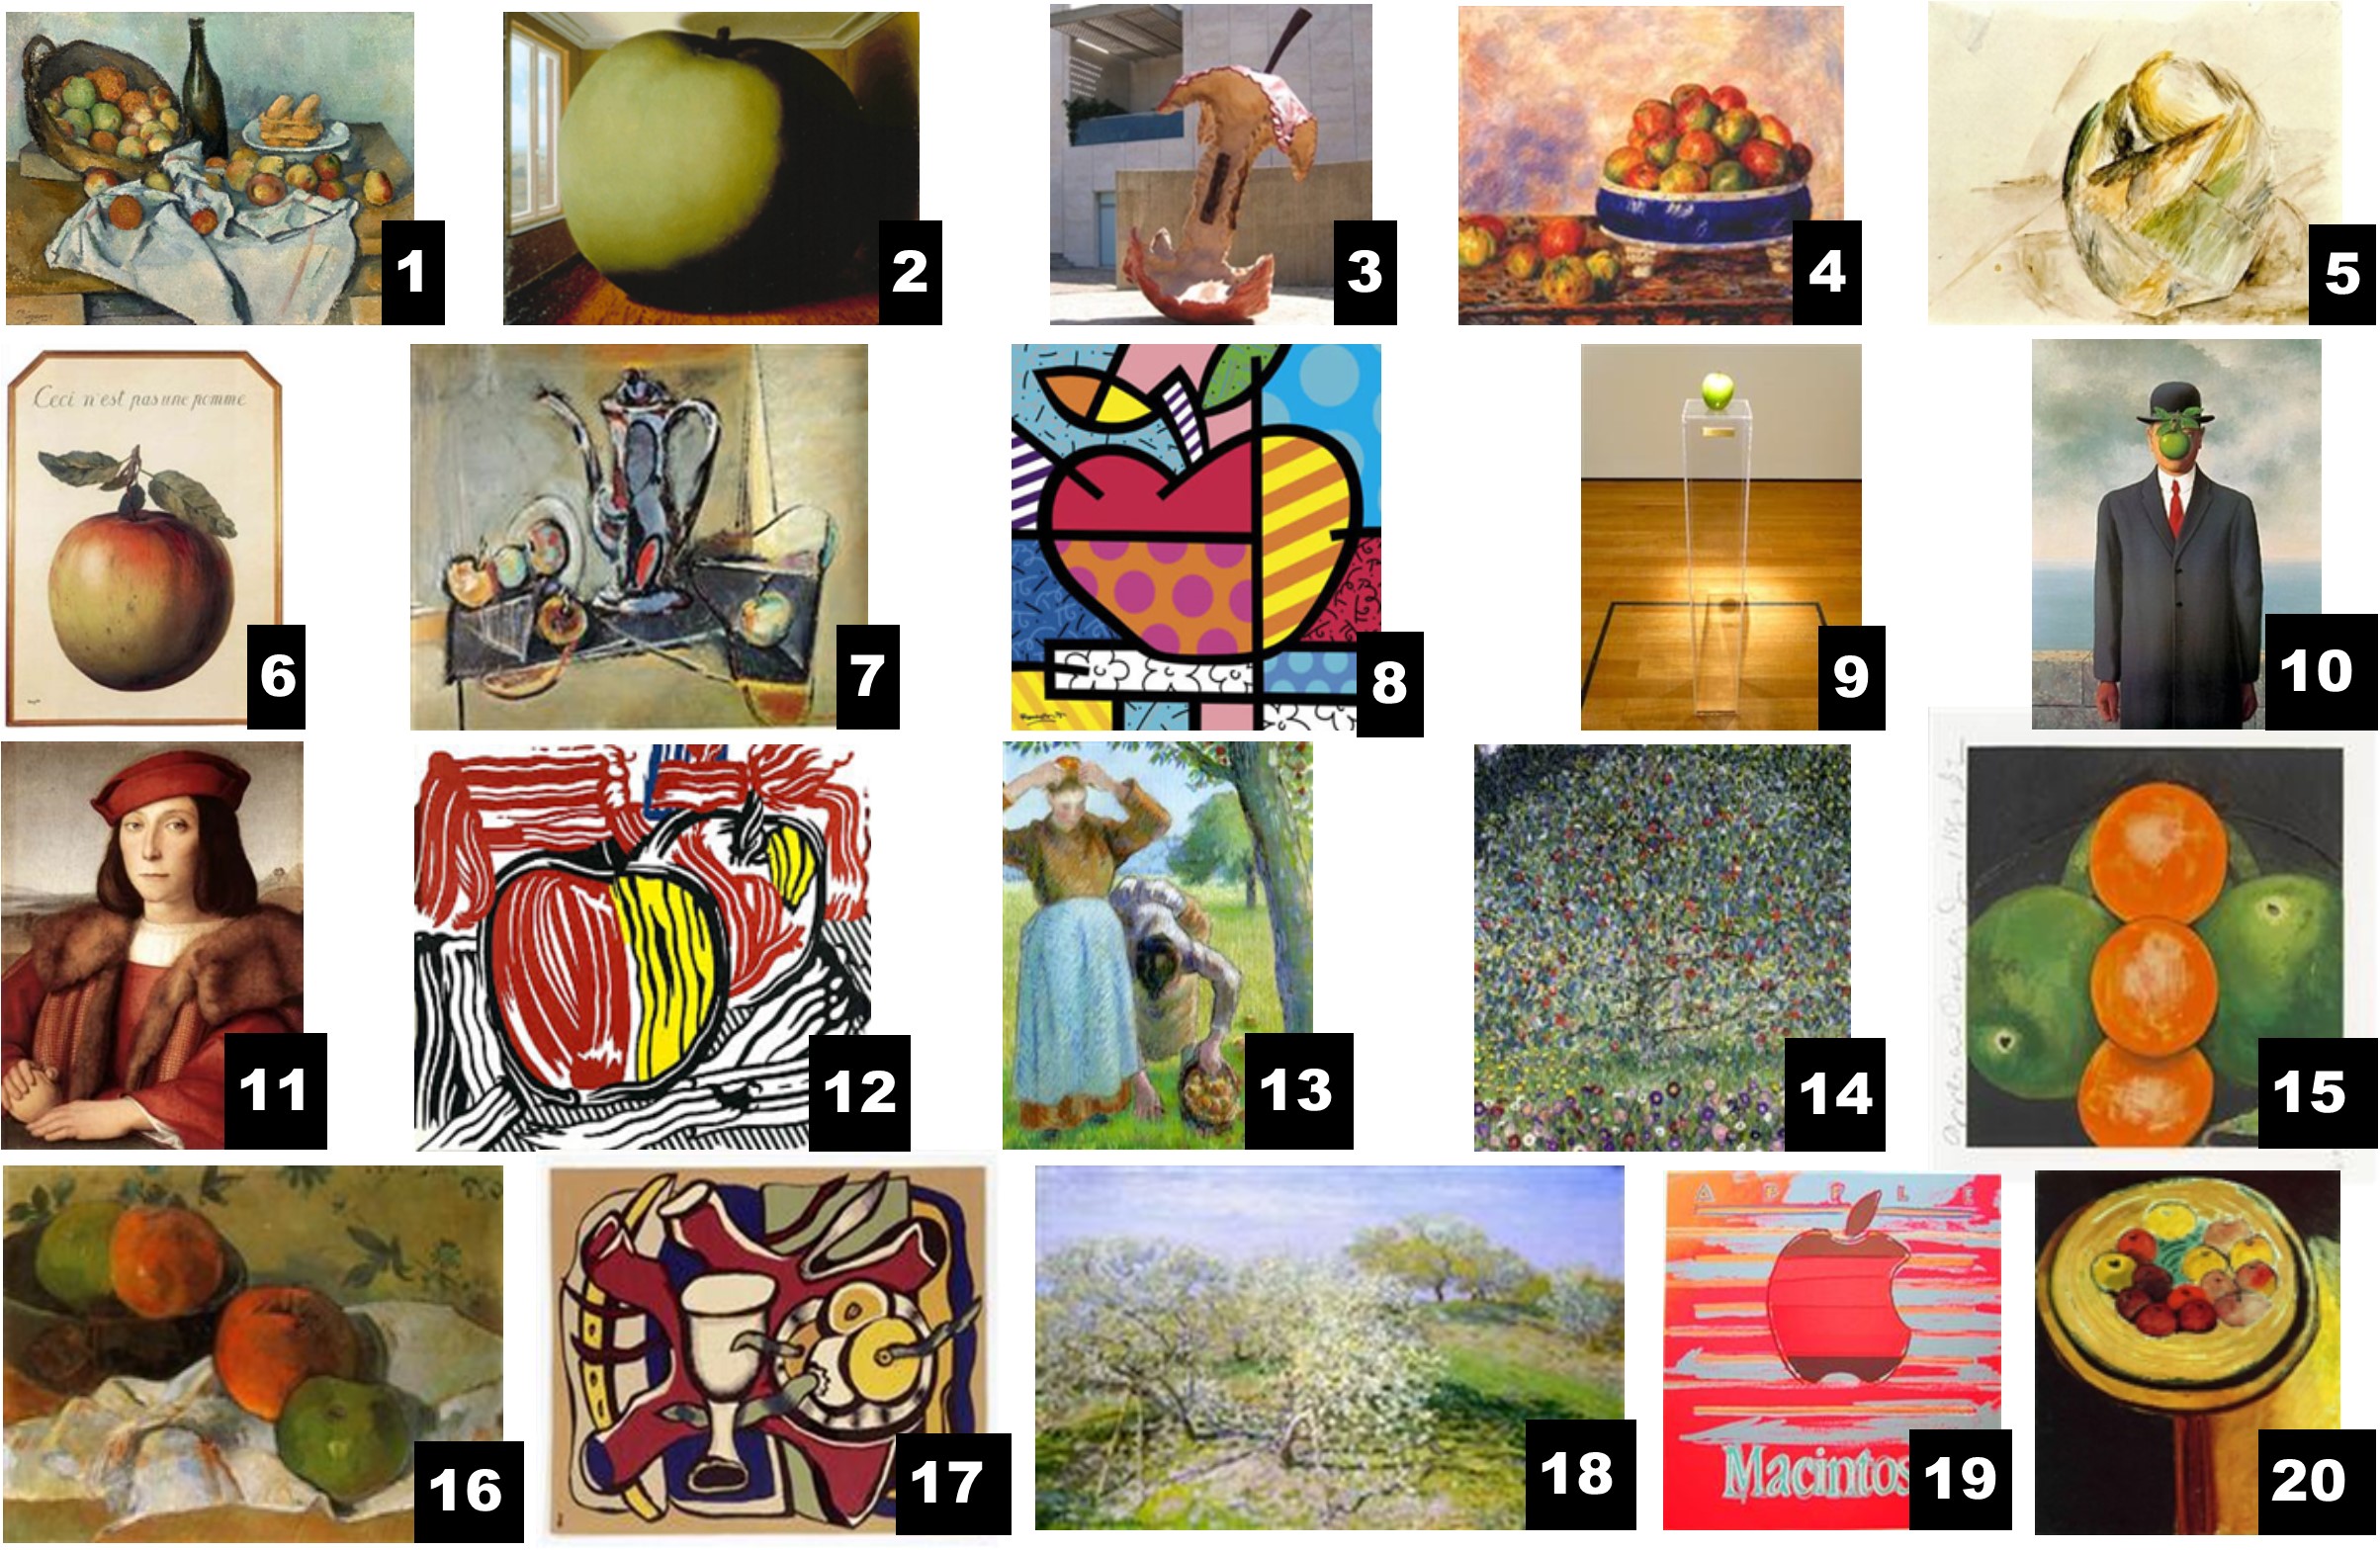
______Apples, Henri Matisse, 1916
______The Basket of Apples, Paul Cezanne, 1895
______Apples in a Bowl, Paul Gauguin, 1888
______Apple Tree, I, Gustav Klimt, 1912
______Still Life with Apples, Fernand Leger, 1925
______Apple Gatherers, Camille Pissarro, 1891
______Portrait of a Man Holding an Apple, Raphael, 1500
______This is Not an Apple, Rene Magritte, 1964
______Apple Trees in Bloom, Claude Monet, 1873
______Apples in a Dish, Pierre-Auguste Renoir, 1883
______Apple, Andy Warhol, 1985
______Still Life with Apples, Max Weber, 1950
______Apples and Oranges, Donald Sultan, 1987
______Apple, Yoko Ono, 1966
______Two Red and Yellow Apples, Roy Lichtenstein, 1981
______The Son of Man, René Magritte, 1964
______Apple, Pablo Picasso, 1909
______The Listening Room, René Magritte, 1952
______Apple Core, Claes Oldenburg, 1992
______True Apple, Romero Britto, 2017
More about apples & art:
For Paul Cezanne, An Apple A Day Kept Obscurity Away
https://www.npr.org/2014/07/10/330159592/for-paul-cezanne-an-apple-a-day-kept-obscurity-away
Apple Symbolism in Art
https://arthive.com/encyclopedia/68~Apple_symbolism_in_art#:~:text=Apples%20of%20health%20and%20well,paradise%20gardens%20into%20apple%20ones
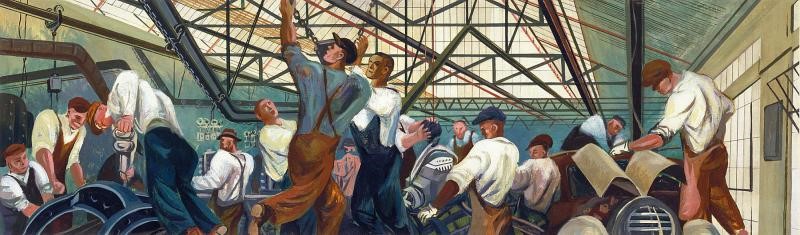
Art Challenge – Celebrate Labor Day with a Peek into History
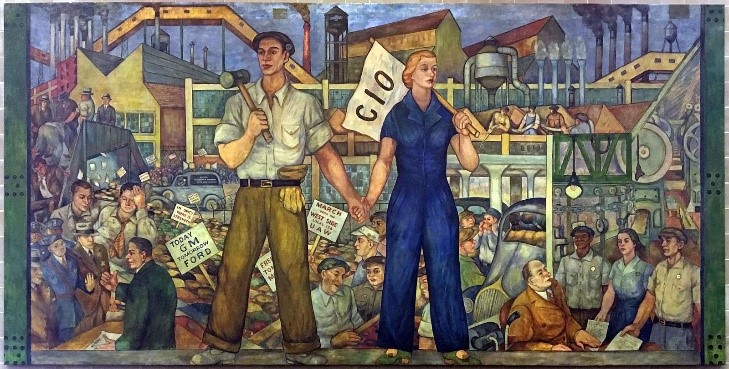
On May 6, 1935, the Works Progress Administration (W.P.A.) was established by President Franklin D. Roosevelt to help provide economic relief to the citizens of the United States who were suffering through the Great Depression. The artistic community had already become inspired during the 1920s & ’30s by the revitalization of the Italian Renaissance fresco style which included Mexican muralists Diego Rivera, José Clemente Orozco & David Alfaro Siqueriros.

A detail from Diego Rivera’s Detroit Industry at the Detroit Institute of Arts. (Getty Images)
The Federal Art Project (FAP) was the visual arts arm of the Works Progress Administration (WPA) from August 29, 1935 to June 30, 1943. It was created as a relief measure to employ artists & artisans to create murals, easel paintings, sculpture, graphic art, posters, photographs, Index of American Design documentation, museum & theater scenic design & arts & crafts. The FAP operated community art centers throughout the country where craft workers & artists worked, exhibited & educated others.
Watch! https://www.youtube.com/watch?v=PKsm3SmBBKU
Art Of The New Deal: How Artists Helped Redefine America During The Depression
https://www.michiganradio.org/post/art-new-deal-how-artists-helped-redefine-america-during-depression
Did you know?
- The FAP existed in the 48 states & its strongest outreach was in art education for children. It maintained more than100 community art centers across the nation, managed art programs & held art exhibitions of works produced by children & adults.
- The Birmingham Bloomfield Art Center was originally a WPA-era underground water/sewage treatment plant built in 1939.
- Only a few months after the Federal Art Project was announced, more than 1100 artists were working for the WPA, including artists such as Stuart Davis, Jackson Pollack & Arshile Gorky. In 1940, African American painter Jacob Lawrence would break boundaries with his Migration Series, while William de Kooning, Lee Krasner, Jackson Pollack & Mark Rothko would found the Abstract Expressionist movement just a few years later.
- Article: Artists of the New Deal – https://www.history.com/topics/great-depression/artists-of-the-new-deal
- Artists were paid $23.60 a week. The work was divided into art production, art instruction & art research.

Jacob Lawrence – Migration Series; 1940–41, Casein tempera on hardboard, 12 x 18 in. The Phillips Collection, Washington, DC, acquired 1942.
Watch – https://lawrencemigration.phillipscollection.org/the-migration-series/panels/1/during-world-war-i-there-was-a-great-migration-north-by-southern-african-americans
Watch – https://smarthistory.org/jacob-lawrence-the-migration-series/
- Nearly 200,000 artworks were created under the Federal Art Project. More than 100,000 paintings & murals & over 18,000 sculptures were in municipal buildings, schools & hospitals in all of the 48 states. Even though many of these works were lost or destroyed, much of the country was able to experience art in person for the first time.
- In December 1943, the government auctioned off thousands of FAP-funded paintings in a warehouse in Queens. Paintings were sold by the pound & reportedly a local plumber purchased a large number in bulk for purposes of insulating pipes with used canvases. He discovered that when the pipes got too hot, the melting paint produced an off smell. Herbert Benevy, the owner of a local frame shop, purchased a large number of paintings for $3 per canvas. Among those he bought were paintings by Milton Avery, Mark Rothko & Jackson Pollack.
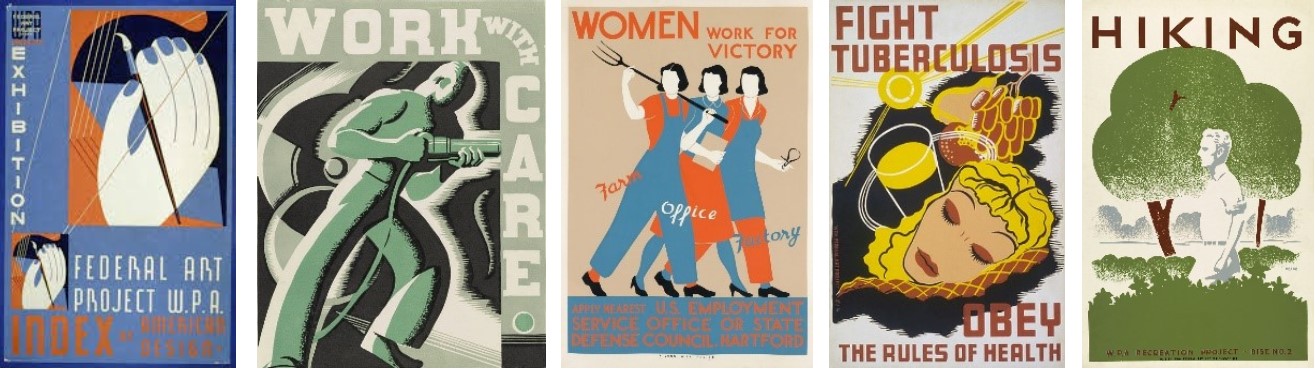
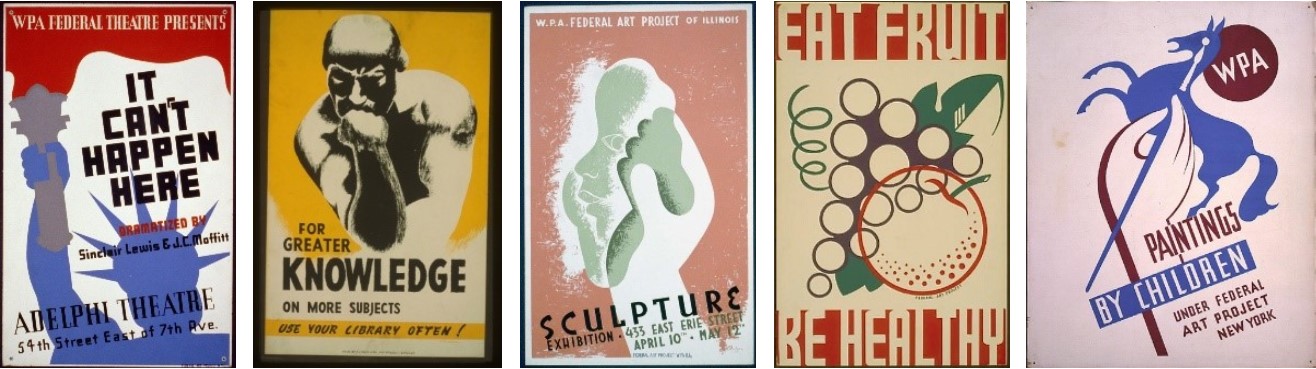
- Over 2000 WPA posters were produced between1936 – 1943. The posters were designed to publicize exhibits, community activities, theatrical productions & health & educational programs in seventeen states & the District of Columbia.
Art Challenge – If you were to create a poster or mural today, what would it look like? WPA posters & murals – see below
Saving a Piece of Labor History by Jim Burton – http://wpamurals.org/detroit.htm
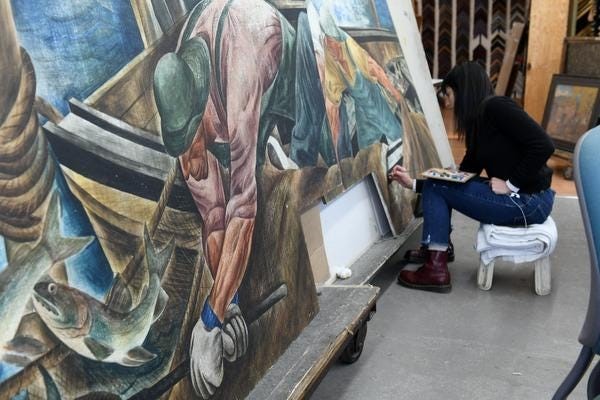

Hauling in the Net by Zoltan Sepeshy,
https://www.detroitnews.com/story/entertainment/2019/12/28/zoltan-sepeshy-mural-beaver-island-cranbrook-detroit-restoration/2703333001/
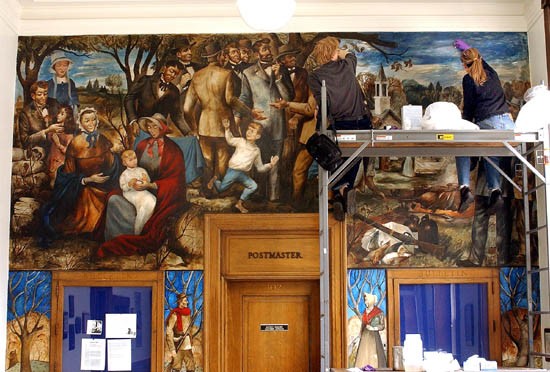
The Pioneering Society’s Picnic by Carlos Lopez, 1942 – http://wpamurals.org/birminMI.htm
William Gropper, Automobile Industry (mural, Detroit Post Office), 1941
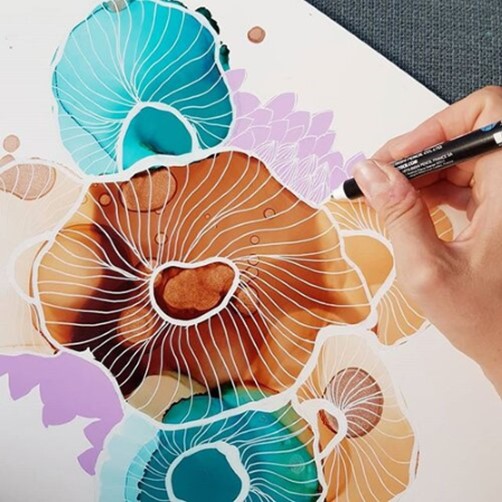
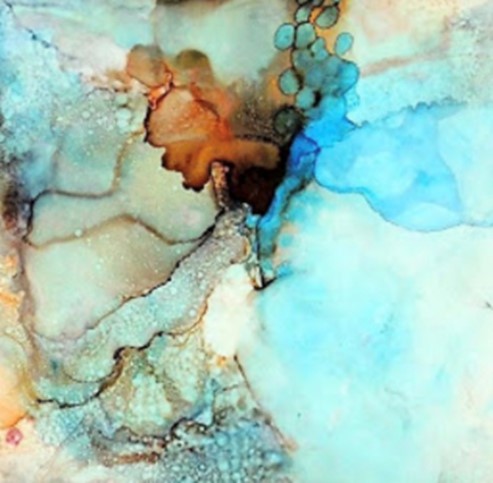
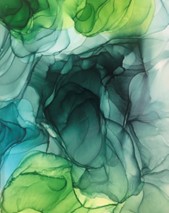
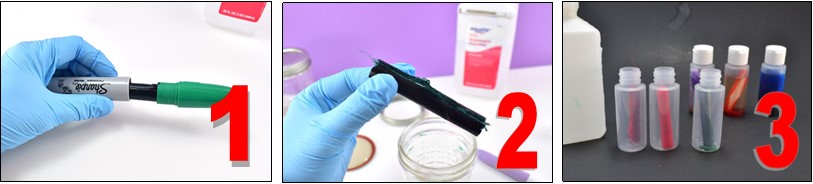
Swirling Art – Make Alcohol Inks with Sharpie Markers

Alcohol inks are waterproof, fast-drying, highly pigmented, alcohol-based inks that work best when applied to hard, non-porous surfaces including glass, metal, plastic & ceramic. They can also be used on glossy cardstock, acetate films & Yupo polypropylene paper. These dye-based inks are most often used in creating free flowing textures & designs. The pre-made inks can be costly & not available in all art supply stores. Try making your own with Sharpie markers & alcohol.

Instructions for making your alcohol inks
PREPARATION
Before you start, prepare your studio space. Work in a well ventilated area, cover your table with plastic & wear disposable gloves.
MATERIALS
- 70% or higher of isopropyl alcohol
- Sharpie markers
- One ounce containers with lids
- Disposable gloves
- Scissors
Step 1 Wear your disposable gloves while preparing the inks. With the cap on your Sharpie Marker, twist the top back & forth. The tip of the marker will pull away from the rest of the marker’s cartridge. Remove the ink tube.
Step 2 Place the ink tube in a one ounce container. You may have to cut the ink tube with a scissors if it is too long for the container.
Step 3 Fill the container with alcohol. Let it sit for at least 1-2 hours with the lid on.
Step 4 Remove the ink cartridge & your alcohol ink is ready to use.
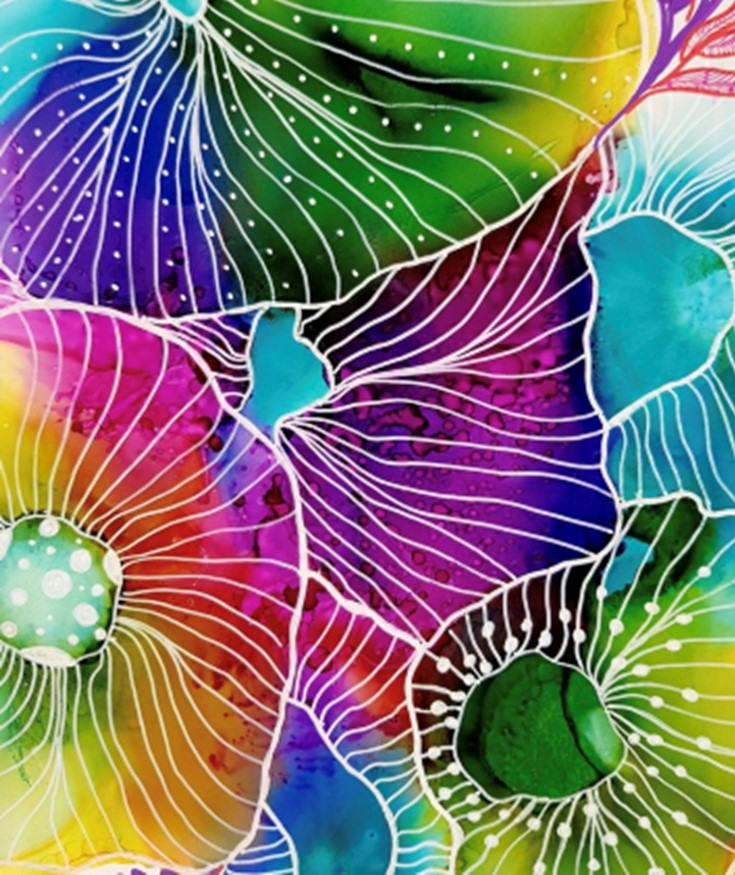
Techniques
Start exploring this medium by working on smaller surfaces such as ceramic tiles, Yupo paper, or glossy papers.
Step 1 Put a drop of color on the surface & watch what happens – it will spread out quickly in a circle.
Step 2 Select a second color & put a drop of it on the circle. The new color will also spread out & displace the first color. Alternatively, you can also place the drop next to the first color so that the circles move into each other.
Watch these tutorials that demonstrate alcohol ink techniques
https://www.youtube.com/watch?v=-zInSB4VZ_I
https://www.youtube.com/watch?v=KlzuS8aGJ3k
https://www.youtube.com/watch?v=hMhk-gMxouM
MORE WAYS TO USE ALCOHOL INKS…
Draw over your designs with paint markers.

Paint on rocks.

Paint on glass.
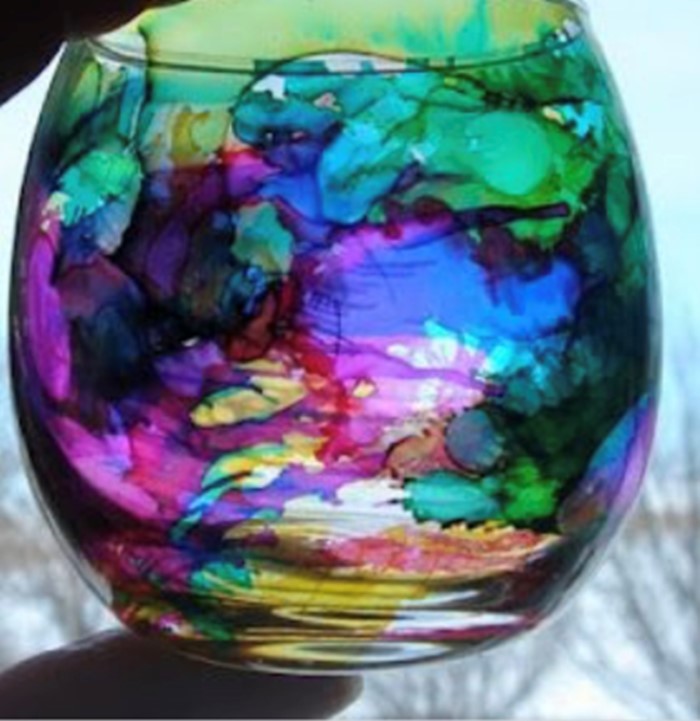
Make alcohol ink coasters.
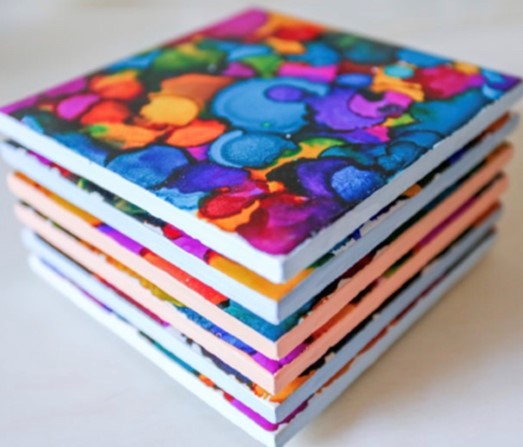
Create a metal washer necklace.

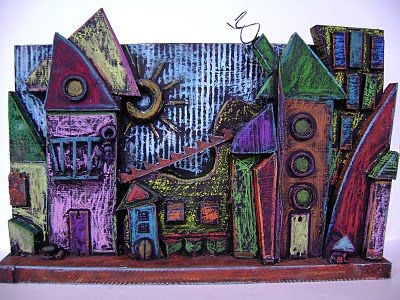
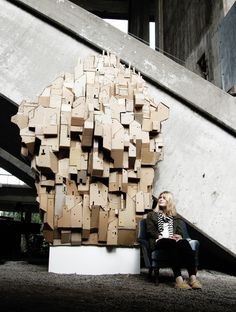
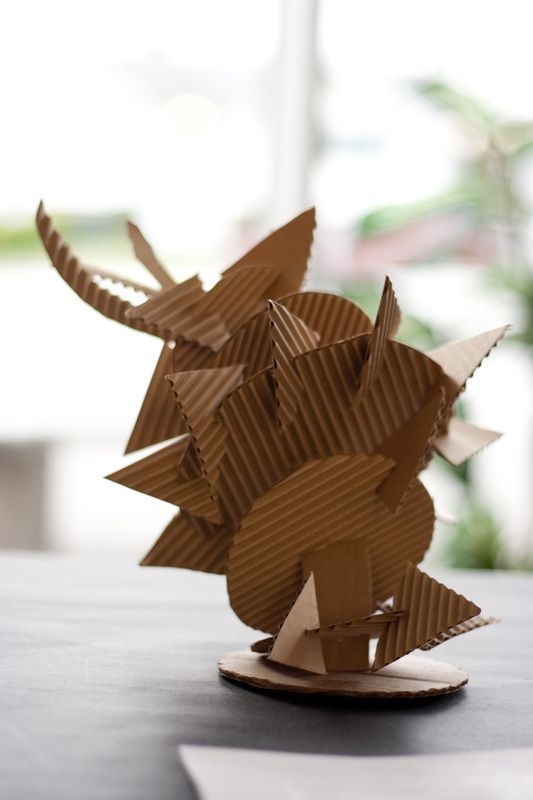
Out of the Box – A Corrugated Art Challenge
Upcycle your delivery boxes to make art. Here are a few techniques to get you started as you explore this unique art medium. Create a relief sculpture where the sculpted elements remain attached to a solid background of the same material.
Try the subtractive technique of removing the top layer of cardboard.
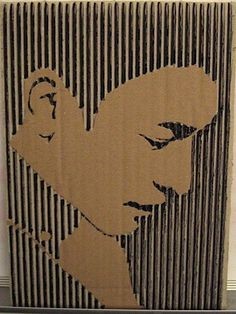
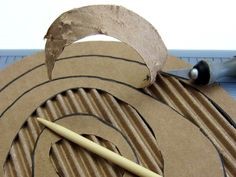

Or build layers of cardboard on top of one another & glue the stacked layers together.
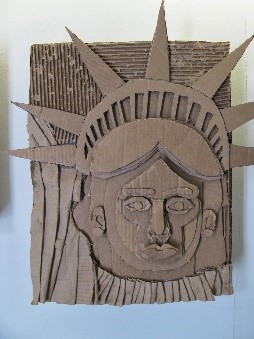
You can incorporate both the subtractive & additive technique & add color to your relief sculpture.

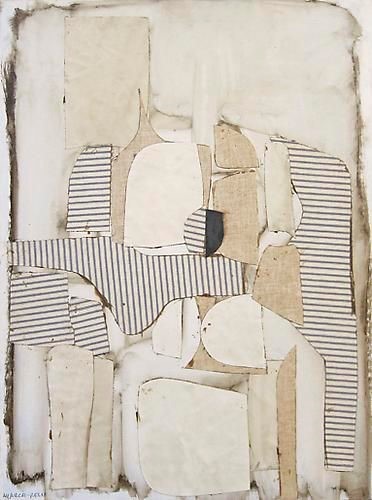
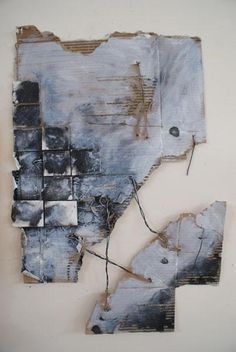
Work by artist Françoise Amadieu
Françoise Amadieu’s profile paintings are simultaneously engravings, paintings & sculptures. They are painted on an unusual yet familiar material: corrugated cardboard. A material normally frail & perishable, the cardboard is made solid & durable (fireproofed, waterproofed & anti-yellowed) through an original process that makes the works durable. Françoise Amadieu is one of these artists who invent their own techniques to create original works. https://www.amadieu.eu/francoise.amadieu/Textes.html
If you have the space – create big!
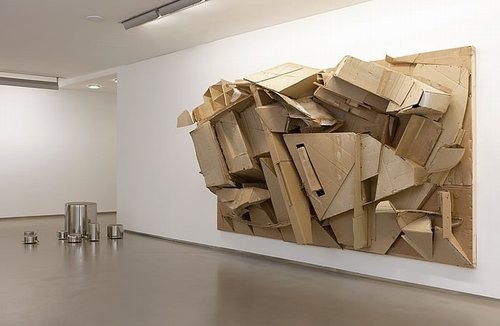

More ways to use cardboard…
Cardboard as a painting ground in place of canvas.
Create a free standing sculpture by making different shapes. Cut slits in the shapes to build 3D compositions.
CARDBOARD ART

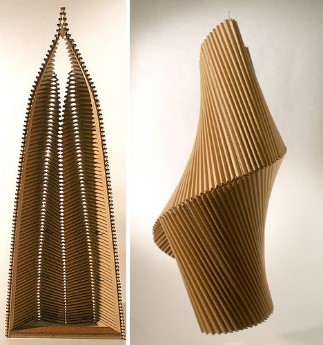

EARLY 20th CENTURY ARTISTS EXPLORED THIS NEW MEDIUM
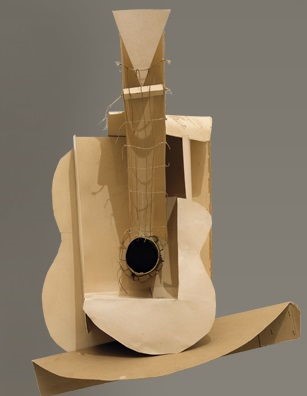 Guitar by Pablo Picasso, 1912 (a later version was fabricated from sheet metal)
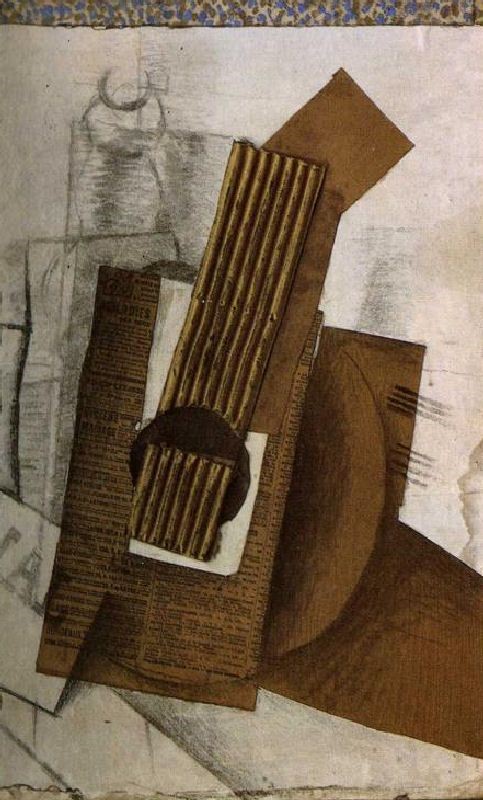 Mandolin by Georges Braque, 1914
“Going back to history, cardboard entered the art scene most notably in Cubist & Dadaist works.”
https://www.widewalls.ch/magazine/cardboard-art-sculpture-artists
DID YOU KNOW?
The first commercial paperboard (not corrugated) box is sometimes credited to the firm M. Treverton & Son in England in 1817. Cardboard box packaging was made the same year in Germany.
The Scottish-born Robert Gair invented the pre-cut cardboard or paperboard box in 1890 – flat pieces manufactured in bulk that folded into boxes. Gair’s invention came about as a result of an accident: he was a Brooklyn printer & paper-bag maker during the 1870s, & one day, while he was printing an order of seed bags, a metal ruler normally used to crease bags shifted in position & cut them. Gair discovered that by cutting & creasing in one operation he could make prefabricated paperboard boxes. Applying this idea to corrugated boxboard was a straightforward development when the material became available around the turn of the twentieth century.
Cardboard boxes were developed in France about 1840 for transporting the Bombyx mori moth & its eggs by silk manufacturers, & for more than a century the manufacture of cardboard boxes was a major industry in the Valréas area.
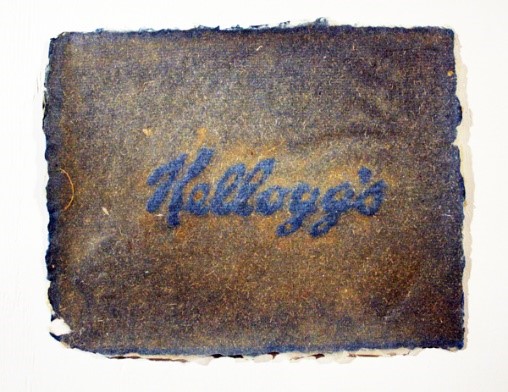
The advent of lightweight flaked cereals increased the use of cardboard boxes. The first to use cardboard boxes as cereal cartons was the Kellogg Company.
Corrugated (also called pleated) paper was patented in England in 1856, & used as a liner for tall hats, but corrugated boxboard was not patented & used as a shipping material until 20 December 1871. The patent was issued to Albert Jones of New York City for single-sided (single-face) corrugated board. Jones used the corrugated board for wrapping bottles & glass lantern chimneys. The first machine for producing large quantities of corrugated board was built in 1874 by G. Smyth, & in the same year Oliver Long improved upon Jones’s design by inventing corrugated board with liner sheets on both sides. This was corrugated cardboard as we know it today.
The first corrugated cardboard box manufactured in the US was in 1895.] By the early 1900s, wooden crates & boxes were being replaced by corrugated paper shipping cartons.
https://en.wikipedia.org/wiki/Cardboard_box
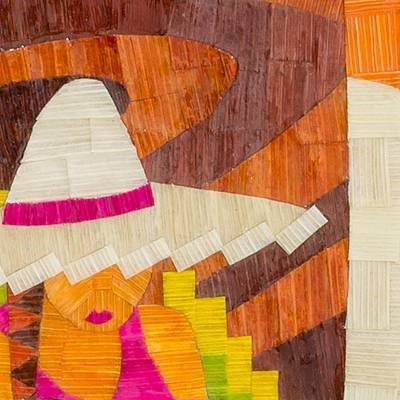
It’s Not Corny…It’s Art!
For centuries in many cultures, every part of the corn ear was used for making rope & fill for pillows & children’s toys. Some contemporary artists have explored ways to use cornhusks as a medium for sculpture & a surface to paint on.
Chris Castillo, Tamalamo, 1850; cyanotype printed on corn husks
Suzy González; “What the World Needs Now”; acrylic, dyed corn husks & oil on canvas
https://suzygonzalez.com/page/1-ABOUT.html


Designer Fernando Laposse; functional & decorative objects made with corn husk veneer
https://www.atlasobscura.com/articles/art-made-from-corn
Corn Husk & Blue Jean Paper: Political Watermarks by Artist Michelle Wilson
https://www.paperslurry.com/2014/05/12/artist-michelle-wilsons-paper-watermarks/
Corn Husk Sculptures
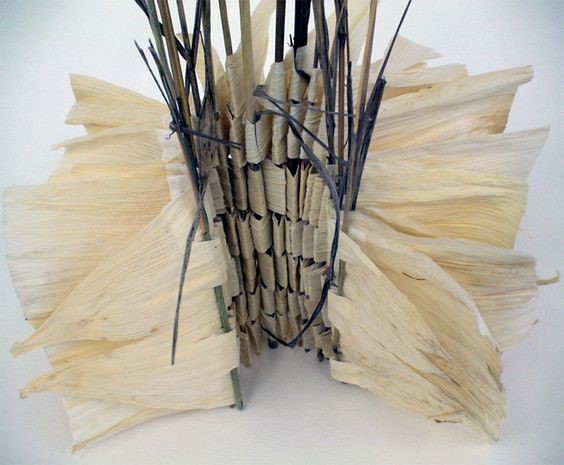

Save your corn husks! Try some of these projects for making corn husk paper sheets, dolls & flowers.
MAKE CORN HUSK PAPER
Ancient Egyptians used the fibers of the papyrus plant for nearly everything, including papermaking. You can simulate papyrus papermaking with cornhusks.

Tutorials for cornhusk papermaking
- Cornhusk Paper Instructions https://www.ehow.com/how_5819683_make-papyrus-paper-corn-husks.html
- Easy Corn Husk Paper Instructions for Kids https://mommypoppins.com/weework-kids-craft-corn-husk-paper
- Dyeing your Cornhusk Paper https://www.midwestliving.com/homes/seasonal-decorating/how-to-dye-corn-husks/
Make a Corn Husk Doll
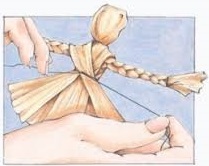
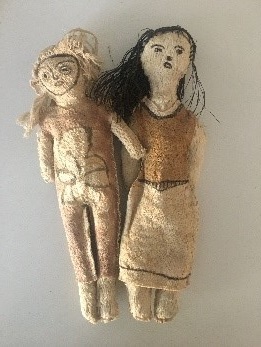
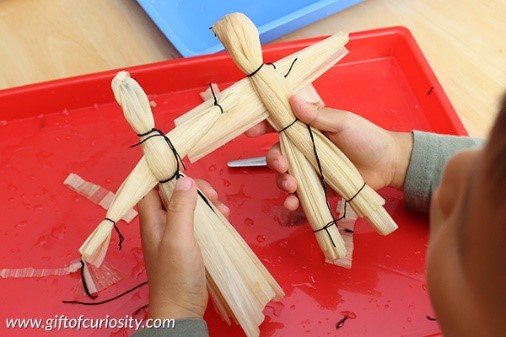
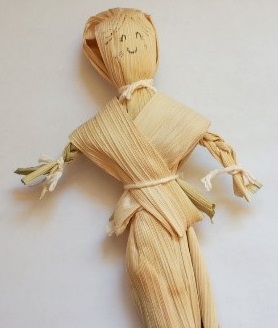
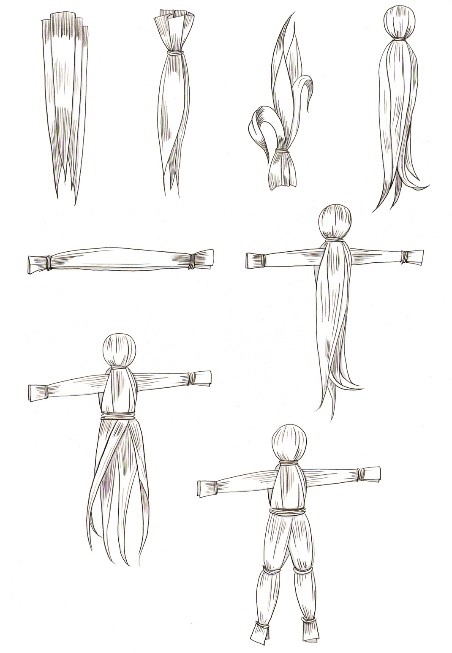
Simple Cornhusk Doll Instructions
- https://www.marthastewart.com/968909/harvest-time-corn-husk-dolls
- https://kidfriendlythingstodo.com/corn-husk-dolls-how-to/
- https://www.cdm.org/wp-content/uploads/2014/06/Making-Corhusk-Dolls.pdf
- http://www.pinkstripeysocks.com/2013/06/make-corn-husk-doll.html
Corn Husk Flowers
There are many online instructions for corn husk flowers. This Calla Lily tutorial provides easy instructions & the results are stunning.
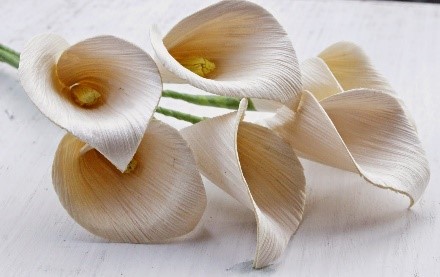
http://accentsandpetals.blogspot.com/2014/08/tutorial-how-to-make-calla-lily-flowers.html
Feed Your Feathered Friends!
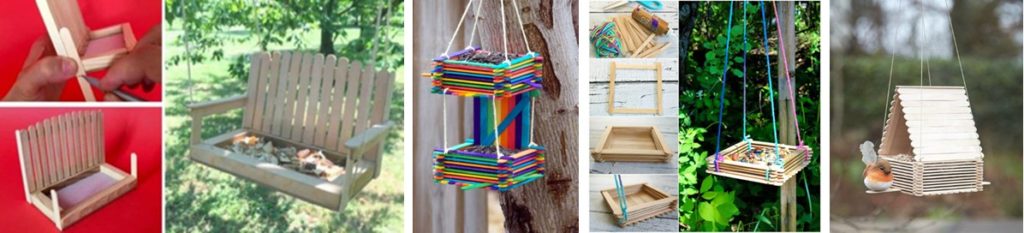

Make a popsicle stick bird feeder. These links provide instructions for a variety of designs or create your own.
- https://thewhoot.com/whoot-news/crafty-corner/popsicle-bird-feeder
- https://www.diyncrafts.com/56548/crafts/how-to-make-a-cute-diy-bird-feeder-out-of-craft-sticks
- http://thecreativecubby.blogspot.com/2013/06/popsicle-stick-bird-feeder.html
- https://www.instructables.com/id/How-to-Make-a-Bird-Feeder-at-Home/
- https://www.instructables.com/id/Make-a-Swing-Bench-Bird-Feeder/
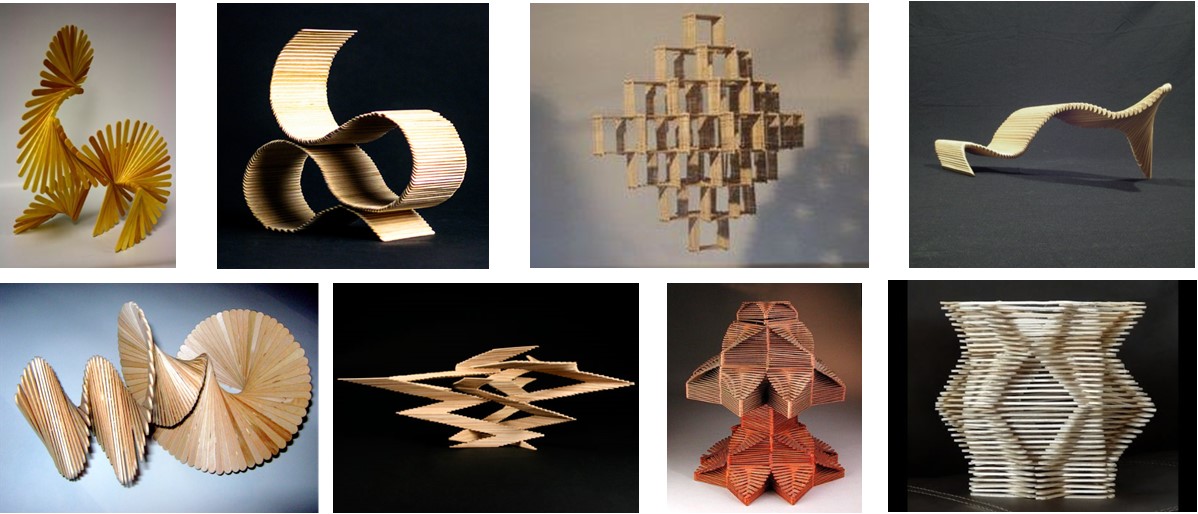
NOT JUST FOR KIDS! Look at these unique sculptural forms made with popsicle sticks.
Share your completed projects with us – send photos to Info@BBArtCenter.org.
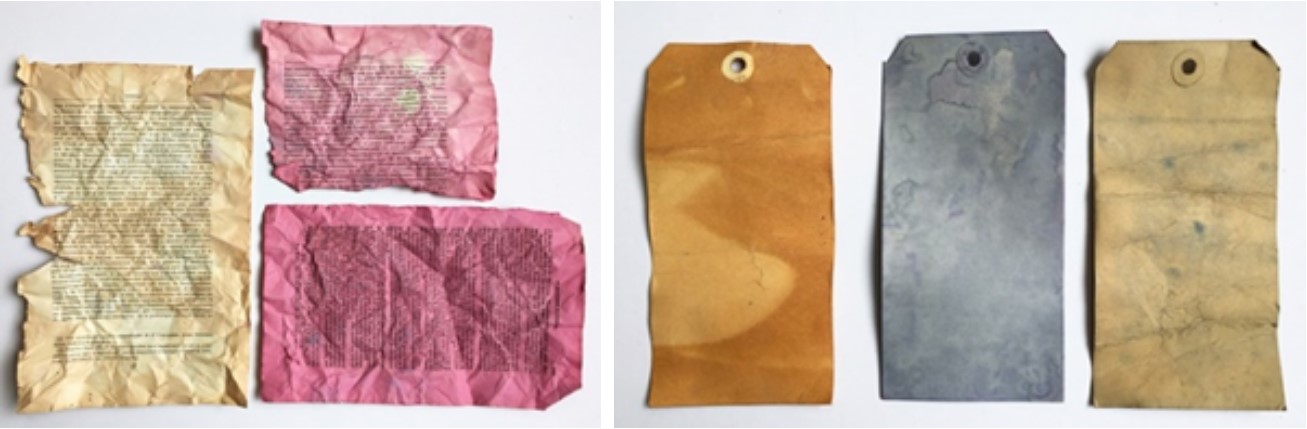
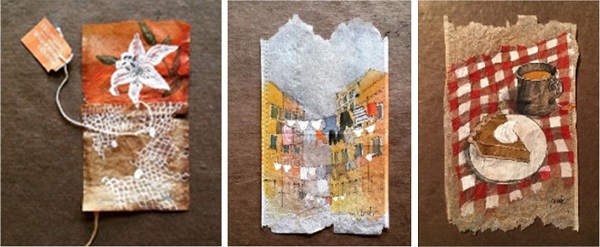
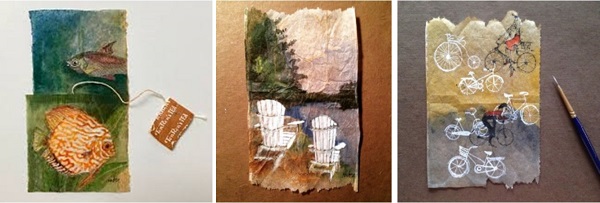
Creative Brew
Recycle your used teabags & create a piece of art. Tea bags make a unique background for pen & ink drawings, watercolor paintings, & mixed media collage. Carefully cut open the edges of your dry used teabag & remove the tea leaves. Glue the tea bag to watercolor paper. Once the glue is dry, you can draw, paint or layer designs over it.
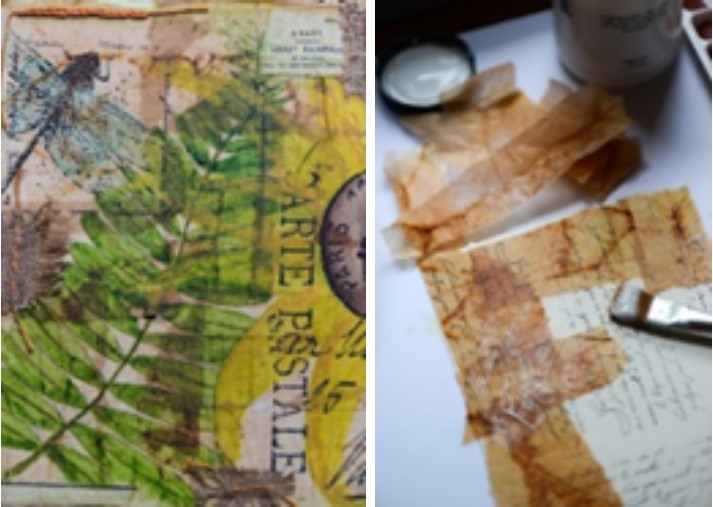
TECHNIQUES
https://www.patinamoon.com/2013/05/watercolor-on-tea-bags.html
MORE WAYS TO USE TEA BAGS IN YOUR MIXED MEDIA ART
TRY IT! Soak papers in brewed tea & explore different teas for a variety of color stains.
TRY IT! Stamp or stencil designs over dried tea bags.
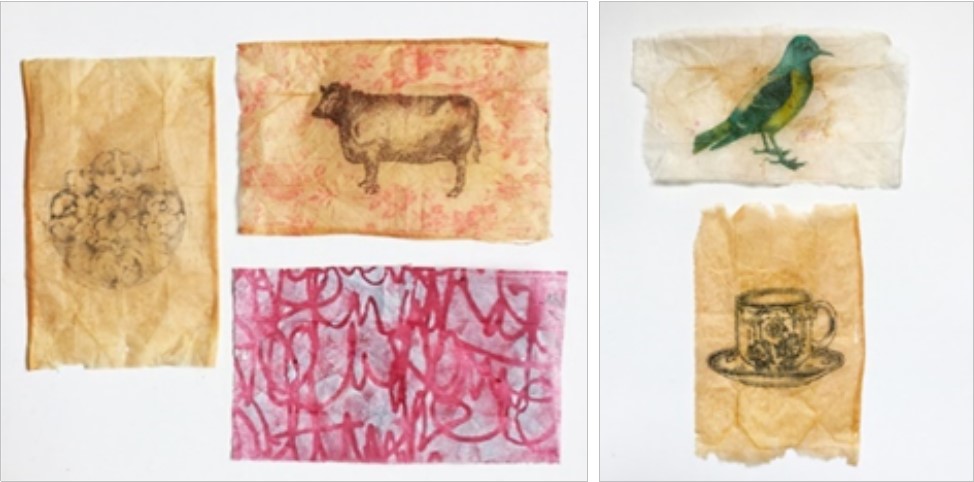
TRY IT! Paint over the tea bag surface with acrylics & watercolor pencil.

GET INSPIRED! More tea bag art…
Summer-zine
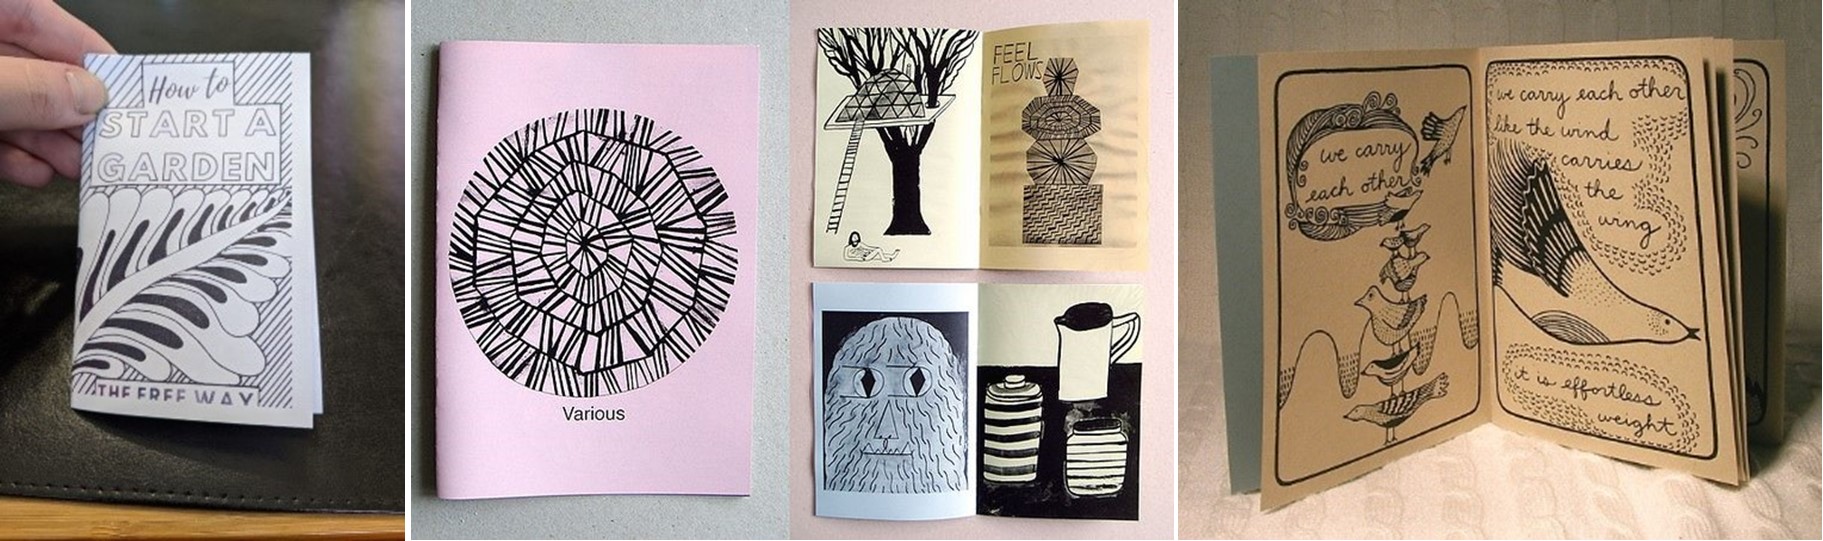
Capture a week of summer memories – create a-zine-a-day.
Zines are self-published mini-magazines – pronounced “zeen”. There are no rules – a zine can be comprised of drawings, poems & short stories using any media & can be reproduced on a copier.
Prepare seven blank booklets using this template with 8.5” x 11” copy paper.
How to make a 6-page book with one sheet of paper!
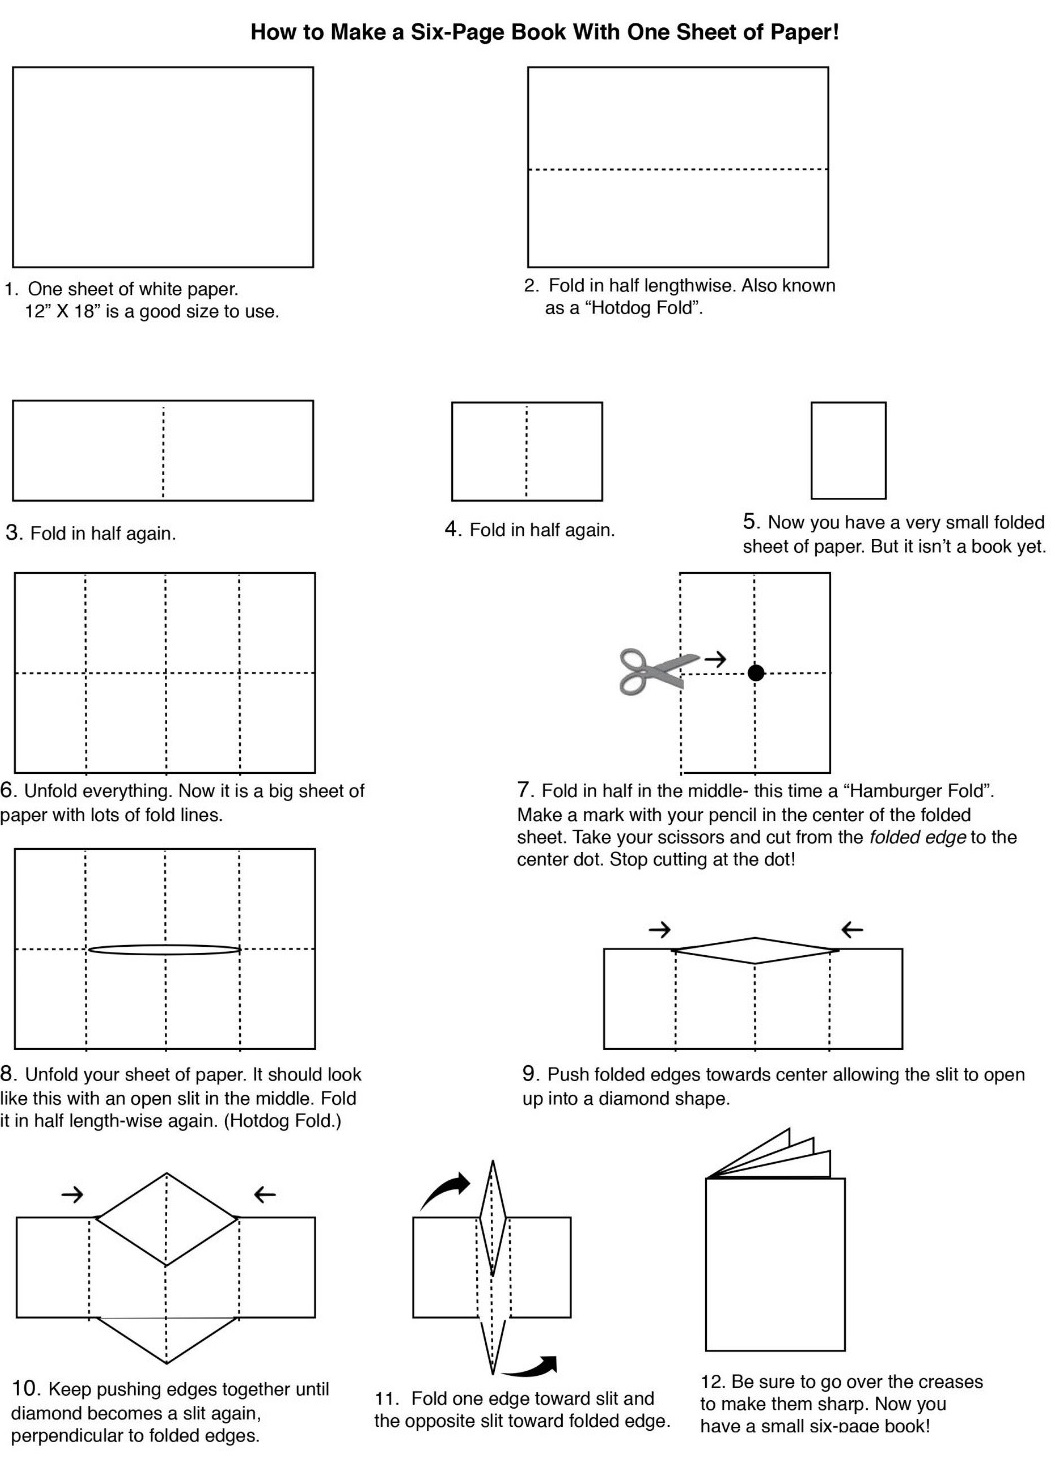
Daily drawing & writing prompts to get you zining….
- Favorite summer treats
- 9 -5
- Road trip
- Garden delights
- Backyard critters & birds
- Cloud formations
- Memories of summers’ past
- Patterns in nature
- Michigan favorites & Up North
Kid-friendly zine link
https://www.itsalwaysautumn.com/make-8-page-mini-book-one-sheet-paper-easy-foldables-idea.html
Hot Days, Starry Nights & Fireflies!
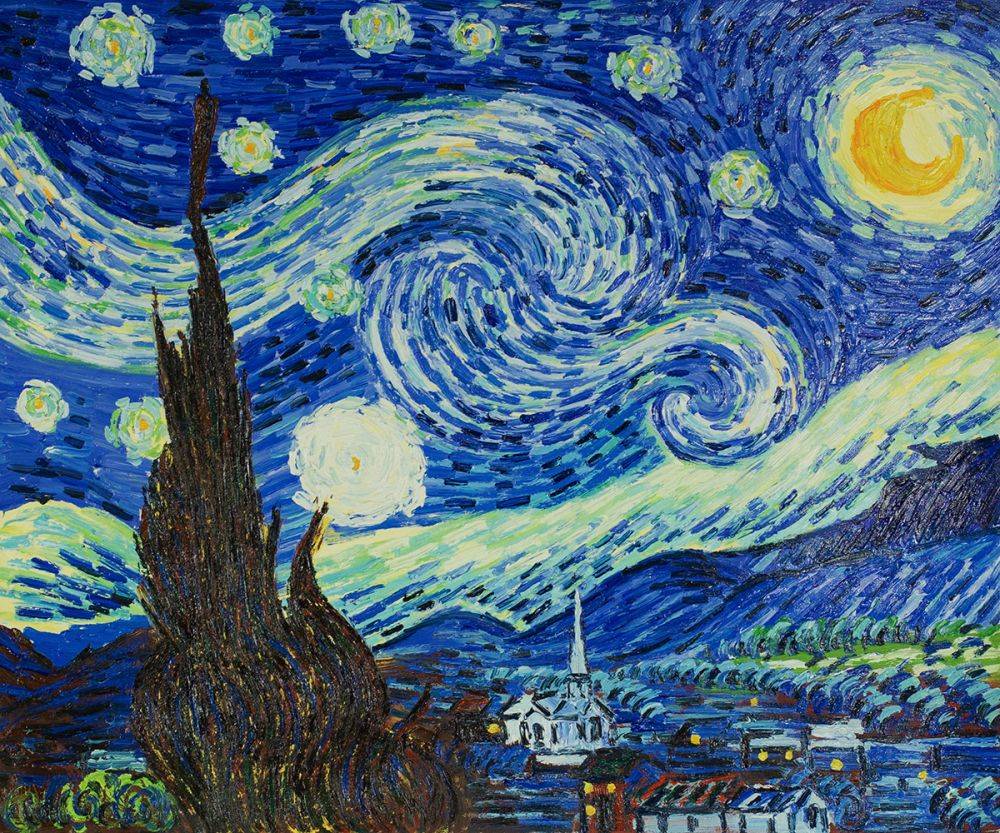
Collect your old crayons to make a melted wax painting inspired by Vincent van Gogh’s The Starry Night (shown above; created in 1889).
Cool off by creating your art with an analogous color scheme of blues, violets & greens. These are colors that are next to each other on the color wheel.
The Process
- Peel off the wrapper of your cool colored crayons (blues, violets & greens).
- Lay them on a sturdy surface such as cardboard & place them in the hot sun for one hour or until they feel soft & pliable.
- Observe the movement & colors in The Starry Night painting. With your melted crayons, blend swirling marks on paper, canvas or cardboard. The wax crayons will be workable for 10-15 minutes before they cool & harden.
- Final step: Melt contrasting warm colored crayons in the sun & apply dots of the yellow & orange wax over the surface to represent stars & fireflies.
Encaustic painting, also known as hot wax painting, involves using heated beeswax to which colored pigments are added. The liquid or paste is then applied to a surface—usually prepared wood.
Famous encaustic paintings:
https://allthingsencaustic.com/famous-encaustic-paintings/
Encaustic techniques:
https://www.clothpaperscissors.com/free-encaustic-painting-techniques/

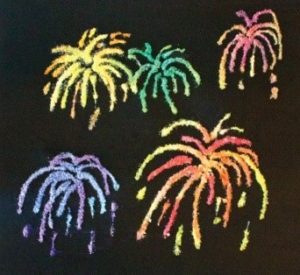
It’s Time for Fireworks!
Tempera Paint & Straw Fireworks
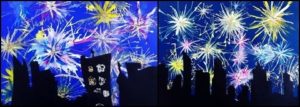
Optional: Add a silhouette cityscape with dark colored construction paper.
HOW TO: http://www.mykidsadventures.com/paint-fireworks/
Shaving Cream Fireworks
HOW TO: https://www.icanteachmychild.com/shaving-cream-fireworks/
Fireworks Salt Painting
HOW TO: https://www.busymommymedia.com/firework-salt-painting/
Read + Watch: The Art of Fireworks
https://news.artnet.com/art-world/10-explosive-pieces-of-fireworks-art-51367
https://www.youtube.com/watch?v=tBBQZH8dg_g
https://www.netflix.com/title/80097472
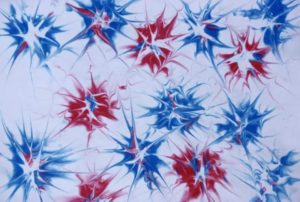
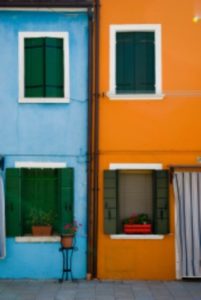
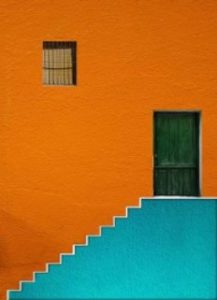
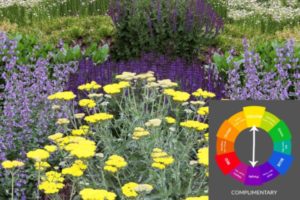
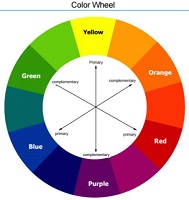
Color Theory + A Complementary Art Challenge!
Explore your environment & the vibrant colors of summer. Capture a photo in which the subjects are represented by complementary colors. Complementary colors are the opposite hues on the color wheel & when placed next to each other, they create the strongest contrast with bold impact. Complementary color pairs include red+green, blue+orange, yellow+purple.
Optional: Create a photomontage using images with complementary colors. “Photomontage is the process & the result of making a composite photograph by cutting, gluing, rearranging & overlapping two or more photographs into a new image. Sometimes the resulting composite image is photographed so that the final image may appear as a seamless physical print.” https://en.wikipedia.org/wiki/Photomontage
Learn more about color from artist & educator, Josef Albers (1988-1976), who is known for his publication Interaction of Color with the key idea that “perception of color is not constant. It is influenced by the juxtaposition of one color with another. The way humans perceive color is influenced by the surrounding context of neighboring colors, lighting conditions, size & quantity.”
More about Josef Albers
https://albersfoundation.org/teaching/josef-albers/introduction/
https://www.moma.org/artists/97?=undefined&page=3&direction=fwd
https://www.guggenheim.org/artwork/artist/josef-albers
https://www.youtube.com/watch?v=8vLAUWQCX98
Bloomin’ Papers!
Make plantable seed paper for gift cards & notes. This project is fun & easy. The recipient will love planting your note & watching your words grow!
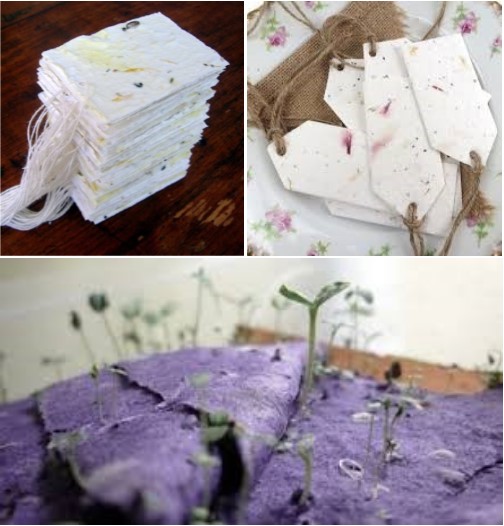
How to Make Plantable Seed Paper
Step 1:
You will first need to gather together a large pile of recyclable paper. Some of the best sources for this paper include newspaper, egg cartons, tissue paper, phone book pages, paper grocery bags, scraps of unprinted computer paper. After you have gathered your paper, tear & shred it into very small pieces. Grab your blender jar & fill it half-full with the freshly torn pieces of paper.
Step 2:
Next, pour some warm water over the pieces of paper in the blender jar. Continue pouring the water into the blender jar until it has filled the blender to the top line. Now you will turn the mushy mess into a fine pulp by turning on the blender to a low speed for about ten seconds. After ten seconds on a low setting, increase the speed for about thirty seconds more. After this there should be no visible paper flakes remaining.
Step 3:
Now comes the time to add the seeds. Sprinkle about a teaspoon of flower seeds into the mixture & stir them in. DO NOT BLEND! Stir them only. As for the type of seeds to use, it would be a good idea to use a wildflower seed blend that is adaptable to the type of climate in which the seed paper will be planted. After you have added the seeds, pour the mixture into a strainer & get rid of as much water as possible. You can use a spoon or spatula to press the mixture against the strainer to squeeze as much water as you can from the pulp.
Step 4:
You will now need to lay out a piece of terry cloth, microfiber towel, or flannel on a flat surface. Dump the pulp onto the fabric & use a spoon or spatula to spread the pulp over the fabric. You can spread it into any shape you want, just be sure to spread it as thin as possible to ensure it dries quicker. After you have spread the pulp, use a sponge to flatten the mixture & soak up more water. After the pulp has dried on one side, turn it over & allow the other side to dry completely. Once both sides are dry, your seed paper is ready for use.
https://www.naturesseed.com/blog/how-to-make-plantable-seed-paper/
Here are additional links about making seed papers…
https://www.thesprucecrafts.com/how-to-make-seed-paper-2905562
https://christines-crafts.com/seed-paper-tutorial/?9112785285=
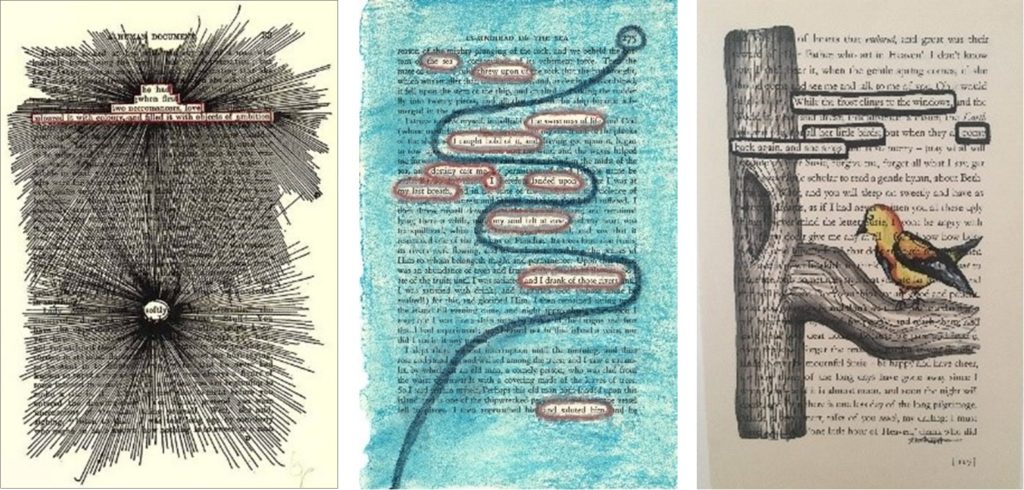
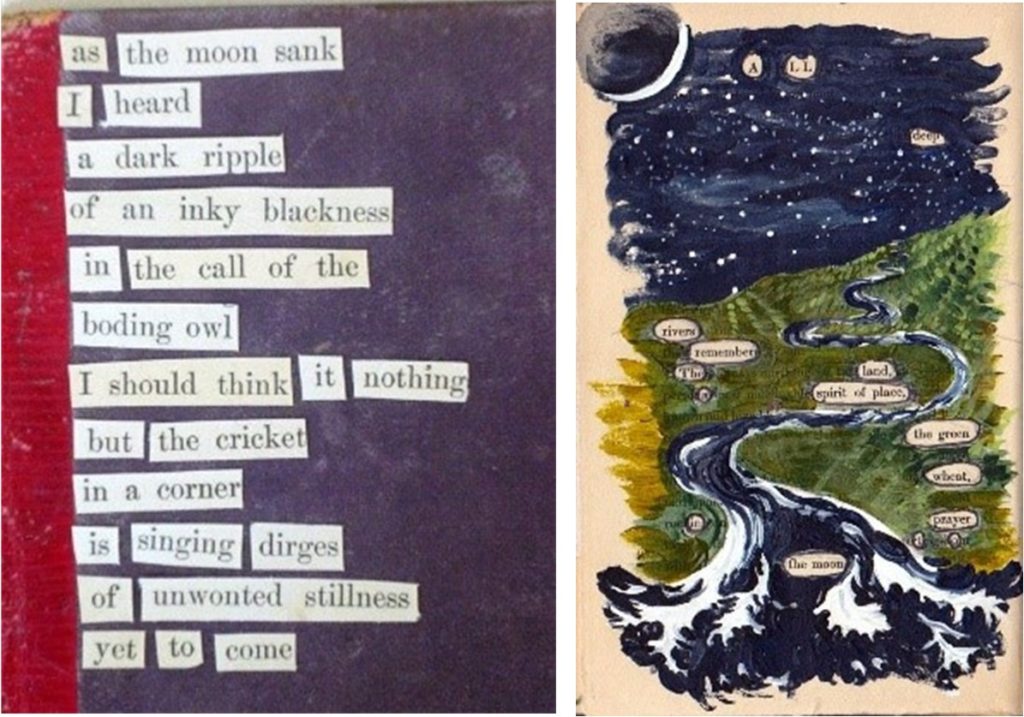
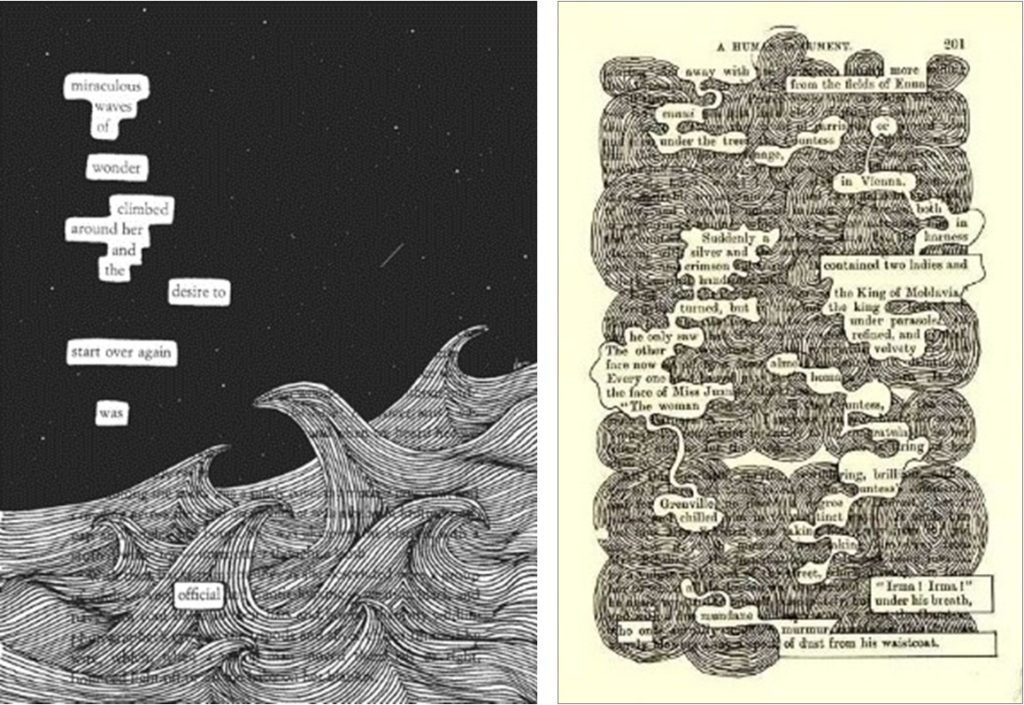
BBAC Challenge #9: Poetry + Art
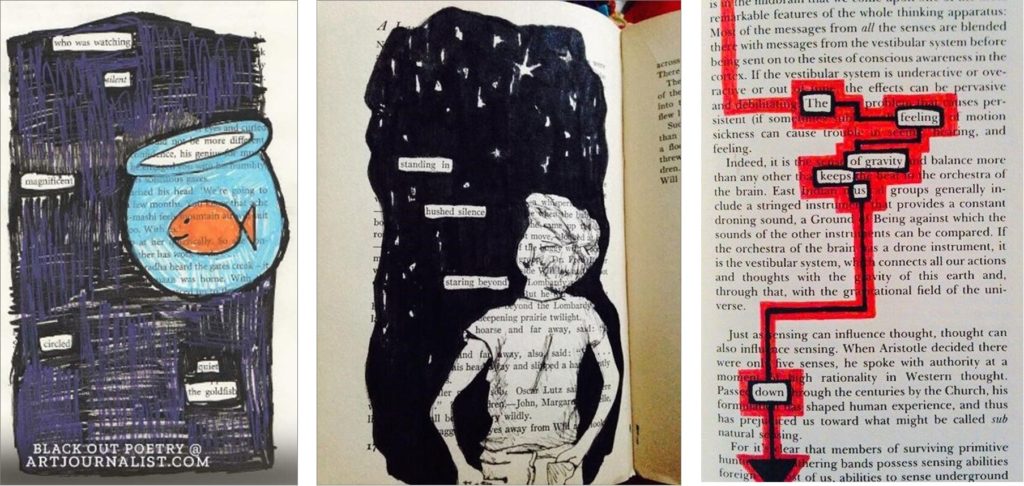
Express yourself through words & personal art. Using already published texts found in books, magazines, newspapers & other media, create a piece of visual poetry. Here are two approaches & examples for creating your own work:
Found Poetry — a type of poetry created by taking words, phrases, & sometimes whole passages from other sources & re-framing them as poetry (essentially a literary collage). By making changes in spacing & lines, adding or deleting text, the final found poetry work bears an entirely new meaning; not related to nor plagiarizing the original text.
Blackout Poetry (Redacted Poetry) — stems from found poetry & is characterized by the use of a marker (usually black marker) to existing text (e.g. newspaper, magazine, book, etc.) & redacts words until a blackout or redacted poem is formed.
BBAC Challenge #8: Pounded Botanical Prints
Leaf pounding is an ancient method of transferring delicate patterns of leaves to cloth. Cherokee women used this technique to decorate garments & used wood ash as the fixer.
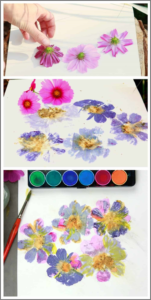
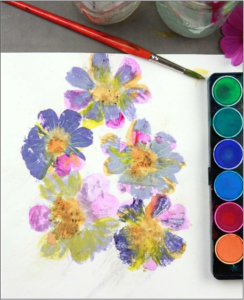
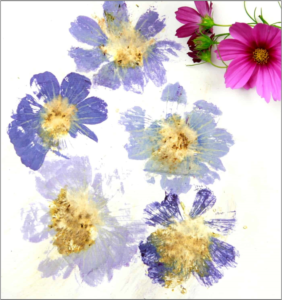
Try it! Transfer your bright blooms onto watercolor paper. The vibrant colors of leaves & flowers are easy to preserve by pounding them to release their natural dyes onto paper. This process is an easy & fun technique for making unique cards, bookmarks or prints to display in your home. All ages enjoy it too!
Materials
- Watercolor paper
- Fresh store-bought flowers or flowers from your garden *flowers with brighter pigments transfer best – bright yellows, dark purple…
- Hammer
- Waxed paper or paper towels
- Wood board or cutting board
Steps
- Cut each flower at the base but be careful to keep the flower intact. If the flower has a large center, remove it & use only the petals.
- Place the watercolor paper on top of a cutting board. Arrange your flowers facedown on the watercolor paper
- Cover the arrangement with waxed paper or a paper towel
- Use the hammer to pound around the circumference of the flower but avoid the center otherwise pollen & moisture will stick to the paper. Repeat this process until you are happy with the final print
- Carefully remove the waxed paper or paper towel. Set the paper in a cool dry area, let it dry completely & enjoy!
- You can try this same technique on fabric. Place the fabric over the upright flowers & pound directly on it until you see the color coming through the cloth.
- Optional: Paint into your print with watercolors or add details with colored pencils or pastels to create your own Impressionist style art.
Inspiration
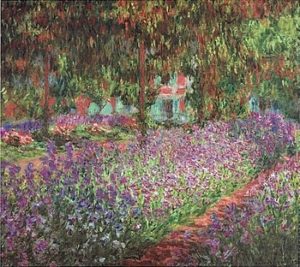
The Artist’s Garden at Giverny, Claude Monet, 1900
BBAC’s Art Challenge #7: Deconstruct + Reconstruct Your Holiday Weekend
Capture memories this weekend on your camera or smartphone.*
INSTRUCTIONS
- Print your favorite image on plain copy paper.
- Deconstruct your photo by cutting or tearing it into different shapes and sizes.
- Reconstruct your composition by rearranging the pieces into a new composition & gluing them to a sheet of paper.
*You can also complete this challenge by using your photo editing software.
Be part of a our virtual photo montage exhibit—take a photo of your final art & email it to: info@BBArtCenter.org
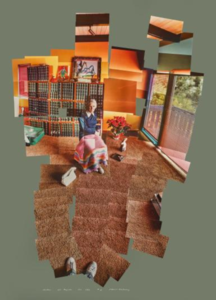
IMAGE: Mother by David Hockney, Los Angeles, December 1982
Artist David Hockney used photography in an original & creative way. Some of his most powerful work in the 1980s consisted of pictures he took of his mother & then constructed as a collage of Polaroids.into
David Hockney video: https://www.youtube.com/watch?v=rz5vWgKy2Sc&list=PLqooWBisybgpU0lYFR2wqGe0HdDzybtWs&index=63
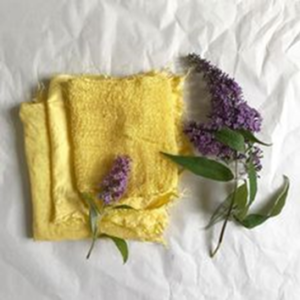
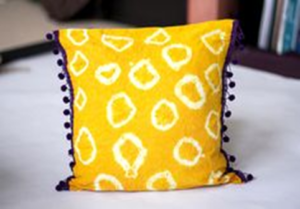
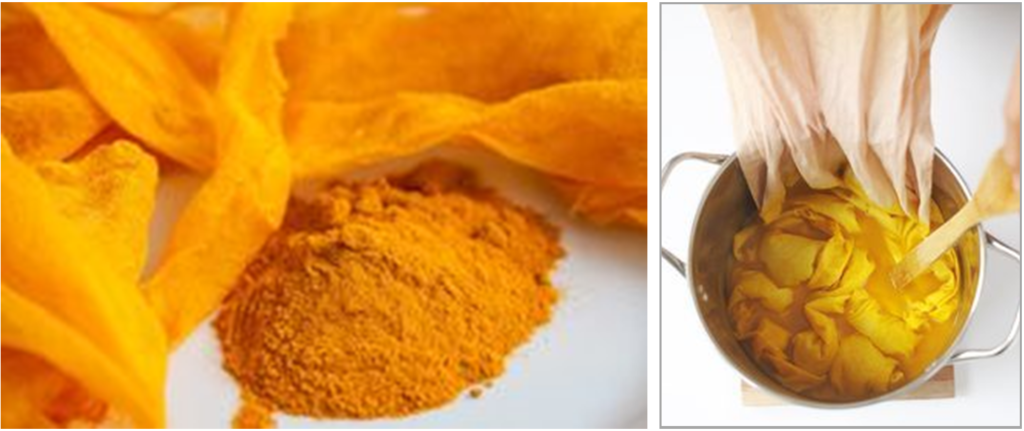
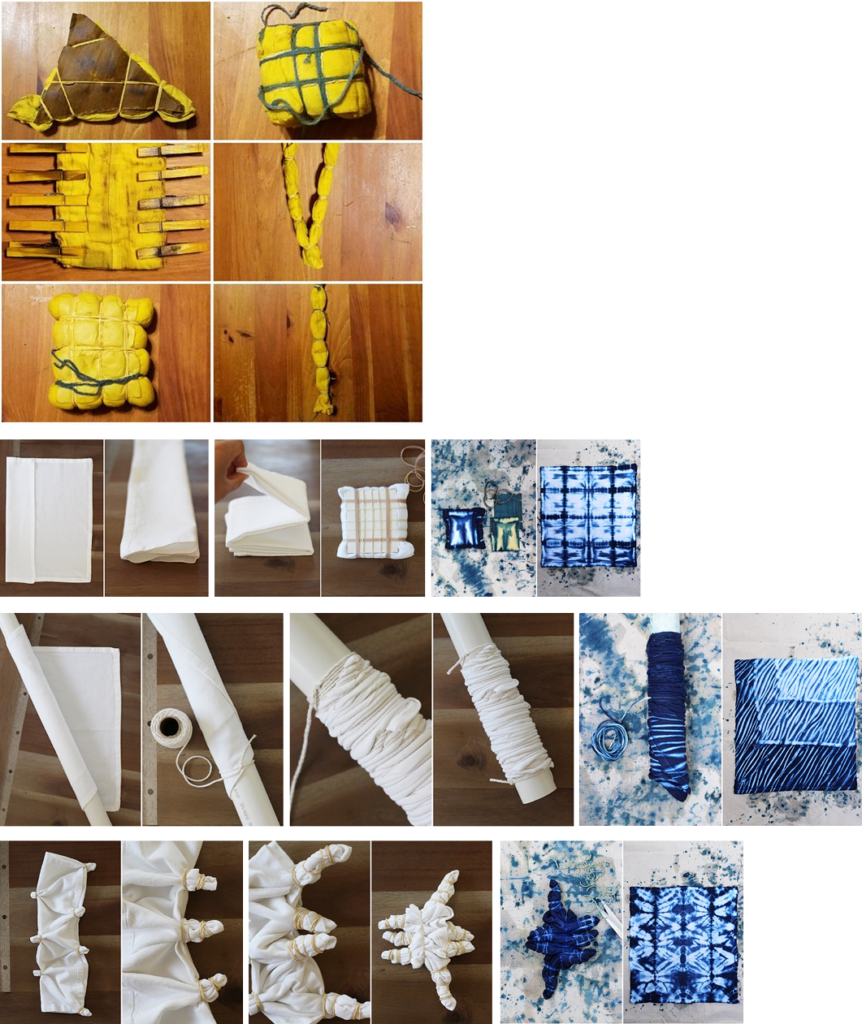
BBAC’s Art Challenge #6 – Get Creative with Turmeric – the Golden Spice!
We cook with it & we add it to our health regimen but did you know that turmeric is also used as a pigment for dyeing natural fibers?
For this week’s challenge, all you need is a few tablespoons of turmeric powder, white vinegar & any natural fiber swatch such as cotton or silk to make a wearable or decorative object. If you do not have fabric, try it with any type of paper that will absorb liquid.
We’d love to see your finished products! Photos can be emailed to: info@BBArtCenter.org
Natural plant products have been used throughout human history for various purposes. Having co-evolved with animal life, many of the plants from which these natural products are derived are billions of years old. The use of turmeric dates back nearly 4000 years to the Vedic culture in India, where it was used as a culinary spice & had some religious significance. Today, turmeric is widely cultivated in the tropics & goes by different names in different cultures & countries.
https://www.ncbi.nlm.nih.gov/books/NBK92752/
Dyeing with Turmeric on Fiber
Here are easy instructions for making your turmeric dye & using a tie dye technique to make a scarf. This same solution can be used for any fiber dyeing project to make all types of wearables or decorative objects.
For instructional images – go to: http://adventures-in-making.com/diy-turmeric-tie-dye-scarf/
Instructions for making the turmeric dye bath:
SUPPLIES
- Turmeric powder (about 2 tablespoons to 1/2 cup)
- White vinegar
- Any white natural fiber such as cotton or silk
- Large pot
- Rubber gloves
- Waxed thread, string or rubber bands
STEPS
- Wash & dry your fabric
- Simmer fabric in a large pot with a water/vinegar solution for one hour (use 4 parts water to 1 part vinegar). This process creates a fixative for the turmeric dye.
- Rinse & ring out your fabric under cold water until it no longer smells of vinegar & set aside.
- Fill the pot with fresh water again (using enough water to cover your fabric) & bring to a simmer. Add the turmeric powder. You can use 3 tablespoons to 1/2 cup of turmeric, depending on how light or dark you want the fabric. Stir until dissolved & let the solution simmer for 10 minutes.
- While the turmeric dye is simmering, tie the fabric into your preferred design. See examples of ties in the links below.
- Submerge the tied fabric into the dye bath & simmer for 15 minutes. Stir the fabric often & turn off the heat after 15 minutes. Let the fabric sit in the dye bath for as long as you want. For a dark yellow/orange, allow fabric to soak in the dye bath for 24 hours.
- Once the fabric is approximately two shades darker than your desired color, remove it from the dye bath & rinse under cold water to remove the excess dye. Remove the rubber bands or string & continue squeezing & rinsing until the water runs clear. Place rinsed fabric in the dryer or hang dry.
- When you need to wash your fabric, hand wash it separately from your other clothes.
Folding Techniques to Create Patterns
Before immersing your fabric in the dye bath, try some of these different Shibori folding techniques to create visual interest in your dyed fabric – explore these links:
https://www.seamwork.com/issues/2015/08/shibori-dyeing
https://www.marthastewart.com/1540786/shibori-dyeing-techniques
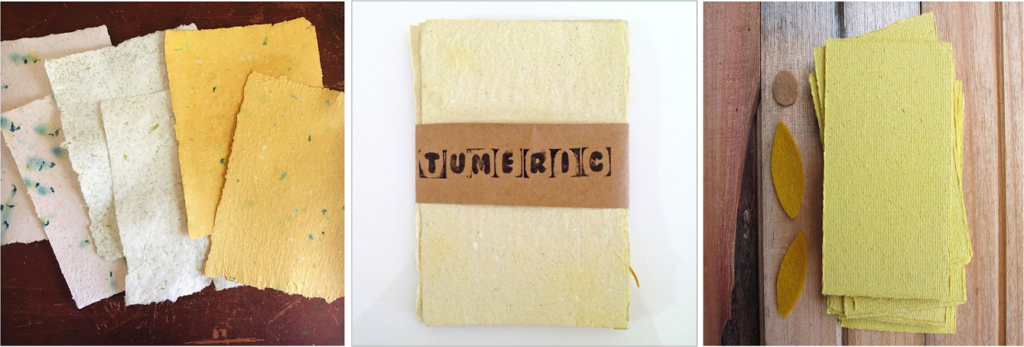
Stain Paper a beautiful golden color with Turmeric
You can use the same batch of turmeric dye to make decorative papers. Interesting patterns can be made using the Shibori folding techniques & dipping the paper in the dye solution. The dye can also work as a painting medium on watercolor paper.
- http://blog.teachersource.com/2014/02/05/make-goldenrod-paper/
- http://brigideda.com/blogs/2013/10/8/tumeric
- https://rebeccadesnos.com/blogs/journal/how-to-dye-paper-with-natural-dyes
BBAC’s Art Challenge #5 – Art + Sound: Found Object Wind Chime
Celebrate Mother’s Day! Create a Found Object Wind Chime to honor a special someone in your life. Make it together or alone. Let the sweet sound of the chimes bring joy & remind you of your time together.
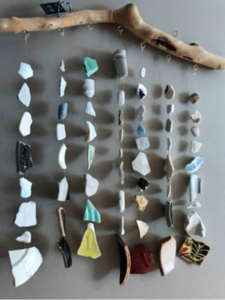
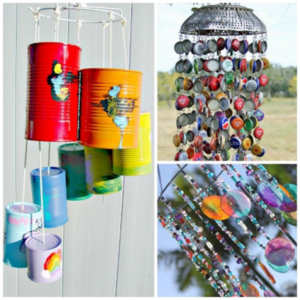
Wind chimes can be made of a variety of materials. Have fun exploring unique objects around your home to create different tones. Suspend the objects from a string & continue changing & adding new forms to achieve the sound that is most pleasing. You can paint or add more elements to your design for visual appeal.
This link provides DIY ideas for making wind chimes from household objects ….the possibilities are endless!
Hang your wind chime outside to enjoy this spring & all summer long!
Here are some links to contemporary artists & their wind chime installations:
- https://mymodernmet.com/tiffany-singh-knock-on-the-sky-listen-to-the-sound/
- https://sf.curbed.com/2019/9/12/20861305/doug-aitken-wind-chime-art-installation-sonoma-winery
- https://news.dartmouth.edu/news/2013/01/ice-chimes-sculpture-installed-let-it-snow-let-it-snow-let-it-snow
- https://www.dezeen.com/2019/09/24/sonic-mountain-doug-aitken-wind-chimes/
Share your wind chime project with us. Take a picture & email your image to: info@BBArtCenter.org
Art + Sound
For years artists have been pushing the boundaries of art by incorporating elements that require the audience to use multiple senses. Visual artists have used sound in their art form allowing the viewer to experience space from a different perspective. Futurist artist Luigi Russolo built noise machines that replicated the clatter of the industrial age as early as 1913. The Dada & Surrealist artists also experimented with art & sound in their work. By the 1950s & 1960s, visual artists such as composer Bill Fontana created kinetic sculptures & electronic media to explore the space around them. Learn more about the use of sound in contemporary art in the following links:
- https://art21.org/watch/art-in-the-twenty-first-century/s8/nick-cave-in-chicago-segment/
- https://www.youtube.com/watch?v=wOBkVw2QyPo
- https://walkerart.org/magazine/soundscapes-for-paintings-joseph-fraioli-georgia-okeeffe-david-hockney-caroline-kent
- https://news.artnet.com/art-world/12-sound-artists-changing-perception-art-587054
- https://www.youtube.com/watch?v=eJ0LKOYjW3Q
- http://fonik.dk/presspics.html
- https://www.artnews.com/art-news/artists/art-basel-sound-installation-jana-winderen-1202670617/
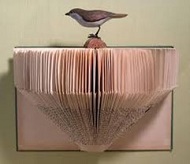
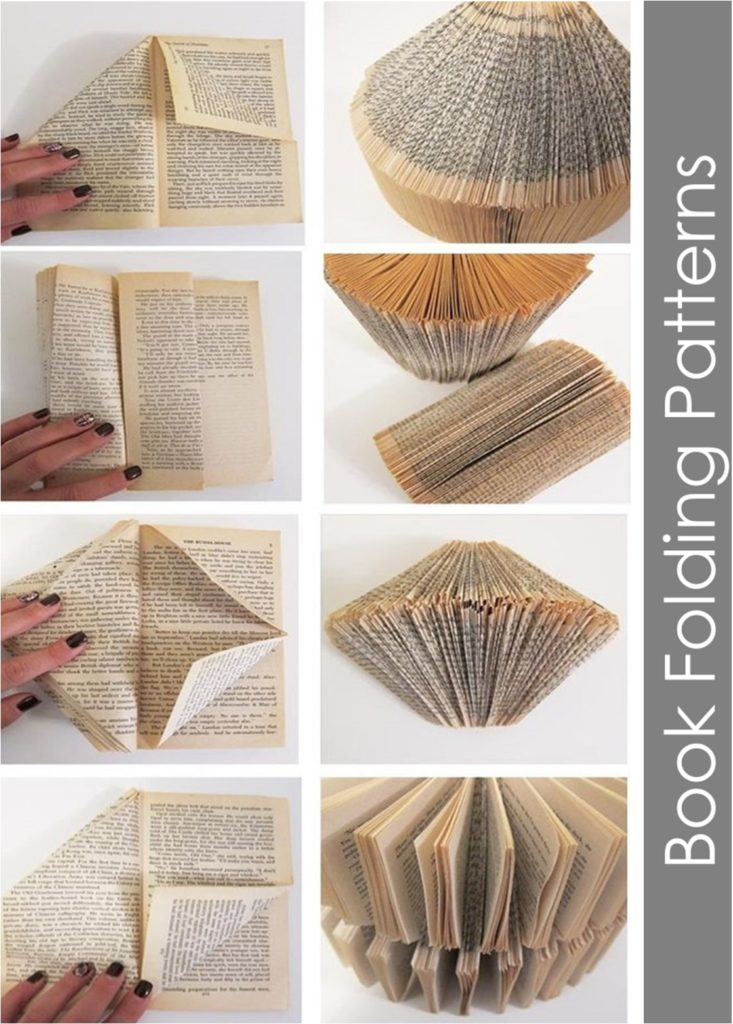
BBAC’s Art Challenge #4 – Folded Book Art
Upcycle a book into a piece of art!
Give new life to an old book. Many books are thrown out each year as they are unable to be recycled due fabric hardcovers & glues used in their production.
Try it! Re-purpose one of your old books & turn it into a work of art for all to enjoy!
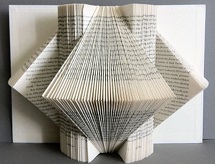
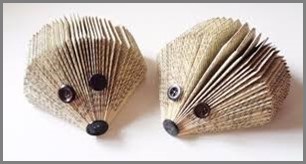
This art activity is fun for all ages, relaxing (therapeutic) & clean! You can do it anywhere – your only art material will be the pages of your book. The results are unique & beautiful using easy repetitive folding patterns to create sculptural forms. A hardcover book can be hung on the wall as a relief sculpture & paperback books work well for free-standing three dimensional shapes. Here are a few easy book folding patterns online. Pick your favorite or do them all! All you need is a book & depending on the pattern you use, it may require an adhesive.
Tutorials:
- http://awhimsywillow.blogspot.com/2012/03/book-art-tutorial.html
- http://blog.sutherlandlibrary.com/2012/01/get-folding.html
Make a hedgehog!
Explore how these artists have used books as a medium.
Doug Beube—dougbeube.com/
Guy Laremee—https://guylaramee.com/
Long-Bin Chen—https://www.long-binchen.com/
Brian Dettmer—https://briandettmer.com
Send us an image of your completed folded paper book art- email to: Info@BBArtCenter.org
BBAC’s Art Challenge #3

Make a Papier-mâché Wish Bowl
Papier-mâché is a popular craft technique using paper & a paste to create a variety of art objects. The method is named after the French term for “chewed paper” & it involves layering of moistened paper & other materials onto a blank surface. The adhesive used to wet the paper acts as a binding agent. Even though the name is French, this method was not used in France until the 17th century. The technique was used in China & elsewhere as far back as 200 BC.
Make a wish! For this challenge, you will be using a bowl as an armature (mold) to make a “Wishing Bowl.” Love, health, happiness, peace…what is your wish? Write it on a piece of paper & roll it into a scroll wrapped with string to place in your finished bowl. Is it a secret wish? You can write your secret wishes on paper & layer them with the strips of pasted papers.
This challenge includes two different instructions for making papier-mâché paste. The first recipe uses flour as the base & a second recipe is gluten-free, using only white glue & water.
As your bowl fills with daily or weekly wishes, what fun it will be to unveil those wishes & plant them in your spring garden to let your wishes grow!
Papier-mâché Paste: Flour & Water Recipe
Materials
- Glass, plastic or ceramic bowl; approximately the size of a soup bowl
- Aluminum foil or plastic wrap
- Large mixing bowl
- Spoon
- Whisk
- All-purpose white flour
- Hot water from tap (not boiling)
- Optional: Colored papers or tissue paper, white copy paper, acrylic paint
Steps
- Cover outside of bowl with aluminum foil or plastic wrap. Optional: spray lightly with cooking spray to make the removal of the completed bowl easier.
- Tear or cut strips of newspaper approximately 1” wide. The length of each strip should not be longer that the diameter of the bowl.
- Mix one part flour to one part water (1 cup of flour to 1 cup of water) and stir well in the mixing bowl with a spoon until it is smooth. Use the whisk to remove any remaining lumps in the paste. The paste should be as thin as pancake batter or thick glue-like consistency. If the paste seems too thick, you can add more water, a little at a time. Mix more paste as needed for your project. Dip the strips of newspaper into the paste. Wipe the strip so it is not dripping wet and apply it to the outside of the bowl over the foil or plastic wrap.
- Repeat this process with the newspaper strips, laying them in different directions until the outside of the bowl is covered. If the strips extend past the bowl, they can be trimmed once the bowl has dried.
- Continue the process until you have added three layers of paper. Allow to dry before adding more layers. If the bowl appears too thin, you can add three more layers.
- If you do not want to paint your bowl, you can add color and design by applying one final layer of decorative papers to the surfaces of the bowl with the flour and water paste.
- Acrylic paint works best for painting your bowl. For inspiration, click here for images of papier-mâché bowls.
- Your bowl is now ready to leave your wishes – papers can be rolled and tied with a string.
Gluten-Free Paste: Glue & Water Recipe
Follow the same directions as the flour and water recipe, replacing the flour with white glue.
The ratio for glue should 3/4 white glue to 1/4 water. If you are using a high quality glue such as Elmer’s Glue-All, you can mix ½ glue to ½ water.
Fun reading about papier-mâché as an art form, follow these links:
Don’t forget – we want to share examples of your work on our website & social media platforms, Facebook & Instagram.Take a photo of your art & email to Info@BBArtCenter.org & put Art Challenge in the subject line.
BBAC’s Art Challenge #2
Cooking Up Art @ Home
Explore different food-safe products in your kitchen to make art supplies & get creative with your young artists!
Here are a few recipes to create two different paint mediums & ideas for making your own paintbrush.
Share photos of your creations by sending them to Info@BBArtCenter.org with “Art Challenge” in the subject line.
Recipe to Make Watercolor Paint
Supplies:
- 4 tablespoons of baking soda
- 2 tablespoons of white vinegar
- ½ teaspoon of corn syrup
- 2 tables of cornstarch or tapioca flour
- Mixing bowl
- Whisk
- Plastic or Styrofoam egg carton for paint (a muffin tin or ice cube tray also works well)
- Food coloring
- Bamboo skewer (or small mixing tool)
Directions:
Step 1 In your mixing bowl, combine the baking soda with the vinegar. Have fun observing the fizzy reaction between the two. Once the fizzing has stopped, add the corn starch & corn syrup. Whisk until smooth.
Step 2 When your mixture looks uniform & shiny, pour it into the egg carton, muffin tin, or ice cube tray, filling each cup about halfway up. Don’t overfill them or the pigments will run into one another in the next step.
Step 3 Squeeze 5 to 10 drops of food coloring into each egg cup & mix thoroughly with a bamboo skewer or any small mixing tool.
Step 4 Allow the pigments to dry between 24 & 48 hours.
Step 5 Moisten your paintbrush with clean water before dipping it on the watercolor cake. You are ready to paint!
Easy Egg Tempera Paint Recipe for Children
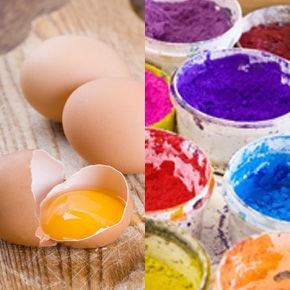
Egg tempera is a painting technique that has been used for centuries. It was practiced by medieval & early Renaissance painters & twentieth century artists including Andrew Wyeth & Thomas Hart Benton. Many contemporary artists continue to use this technique today.
Egg tempera paint is composed of raw egg yolk & powdered pigment. The egg yolk serves as the binder that holds the pigment together. This simplified version for children uses food coloring in place of powdered pigments. Since you are working with raw eggs, hands should be washed thoroughly when you have completed your art. This project may not be suitable for children with egg allergies.
Supplies:
- Eggs
- Food coloring
- Paper
- Paint brushes
- Fork or spoon for mixing
- Bowls
Directions:
Step 1: Separate one yolk from the white for every color you want to make. Each yolk should be drained from the membrane & placed in a separate bowl
Step 2: Add 1-2 tablespoons of food coloring per yolk depending on your desired shade. You can use a fork to mix the egg yolks with the food coloring. Use your paint immediately & allow your art to dry overnight.
For more reading about egg tempera, go to:
https://hyperallergic.com/435242/egg-tempera-painting/
https://www.incredibleart.com/egg-tempera/
https://www.artsy.net/article/artsy-editorial-eggs-popular-material-painters-photographers
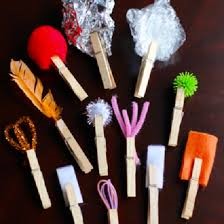
Examples of DIY paintbrushes
Art Challenge 1
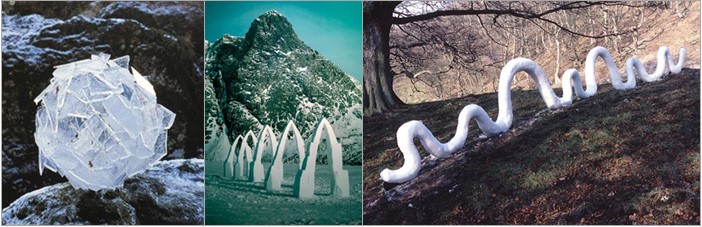
Explore the work by artist Andy Goldsworthy – a sculptor, photographer & environmentalist who produces site-specific sculptures & Land Art in natural & urban settings. Using only natural elements found on-site, he creates his work with materials from the environment such as stones, grass, clay, twigs, snow & ice. The outdoor sculptures are meant to be changed over time by wind, rain, erosion & other forces of nature. Goldsworthy views his artistic process as a “collaboration with nature” & due to its transient state, he established the practice of photographing his work to capture it for a lifetime & showcase it to others.
Learn more about Andy Goldsworthy, his work & artistic process:
- https://www.pinterest.com/mariah1313/andy-goldsworthy/
- https://pl.pinterest.com/dennishauer/andy-goldsworthy/
- https://www.youtube.com/watch?v=fIQKZghtyiY
- https://www.youtube.com/watch?v=FPDH8yCnlk0
- https://www.sierraclub.org/sierra/video/andy-goldsworthys-rivers-and-tides
- https://www.youtube.com/watch?v=LP_-P7ZcWZU
Documentary films on Goldsworthy:
- Rivers and Tides directed by Thomas Riedelsheimer, 2001
- Leaning Into the Wind directed by Thomas Riedelsheimer, 2017
Books:
- Andy Goldsworthy: A Collaboration with Nature by Andy Goldsworthy
- Stone: Andy Goldsworthy by Andy Goldsworthy
- Andy Goldsworthy: Ephemeral Works 2004-2014 by Andy Goldsworthy
ART CHALLENGE: Go on an adventure through your own backyard & observe the natural elements that exist right outside your door. Explore & collect objects from the environment. Observe the designs, patterns & textures found in nature. Create your own Land Sculpture!
Have fun exploring & creating!
More fun with art & nature:
Artist Jacek Tylicki used a unique process for creating his art. Tylicki would leave sheets of canvas or paper in different outdoor environments for long periods of time, allowing nature to imprint its beauty & design on them. (http://www.tylicki.com/) TRY IT!
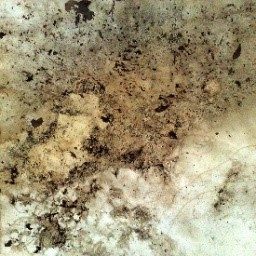
Artist: Jacek Tylicki
Title: Nature No. 1 “4 days in the grass of the meadow, S.W. of Lund, Sweden”
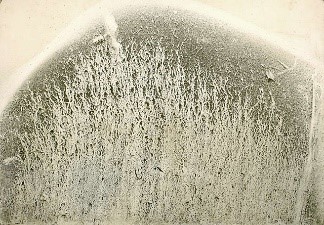
Artist: Jacek Tylicki
Title: Nature No. 81 “Three days on the bank of the Hoje River, S.W. of Lund, Sweden”